30 May 2011

S'mores Cookies

My daughter is a Daisy Scout.  (A Daisy is the early stages of Girl Scouts.) It's so cute, really.  She's got a blue vest with a Girl Scout pin. And she already has a few patches. I mean, I was a Brownie when I was young so I expected her to get patches. But, nowadays, they get patches for their birthday and losing a tooth. There was even a Father/Daughter dance. Picture this: a bunch of Kindergarteners all dressed up going to a dance with their daddies. So freakin' cute, let me tell you!


Anyway, after we got through all the cookie sales ("Jordan" sold 115 boxes) the leaders decided to have a barbecue to celebrate their accomplishments.  I, of course, volunteered to bring cookies. Because, um, I have a food blog, remember? Perfect fit. But what kind of cookie do I bring to a Girl Scout function?


S'mores cookies, of course. It was around this time I was on the quest to find a perfect chocolate chip cookie. I used the traits of what I loved in so many other recipes and came up with this cookie base. But plain chocolate chip cookies, while awesome, can be boring. I mean, go to a potluck and you'll find three choices, many from big-box grocery stores. Awhile ago, Picky Palate (awesome blog, check her out!) made several recipes involving stuffing things in chocolate chip cookies. One such recipe was stuffing an entire s'more into a cookie. Genious.


I didn't want to do the same thing she did, but I wanted something along those lines. So I thought, why not use marshmallows and chocolate covered graham crackers? It's all the ingredients of s'mores, chopped up into a cookie.


These are super easy to make, they just take a little extra time. Make the cookie dough and scoop out a portion. Make a thumprint in the center, add two mini marshmallows, and roll the cookie into a ball. The chocolate covered grahams are already chopped up in the cookie dough and the cookies will have a gooey marshmallow center.


Remember those Nestle commercials from when you were a kid? Where the kid pulled the cookie apart and the chocolate chips made chocolate strings? I always tried to do that and never succeeded. Works with marshmallow centers, though!


Now, the one thing I would change (and have reflected in the recipe) is that I would freeze my mini marshmallows before stuffing them in the cookie. Some of the cookies opened up a little and the marshmallow stayed in tact because it was on the top of the cookie. But, in the cookies that the marshmallows stayed inside, the marshmallow sort of melted into the cookie. After the fact, I remembered a recipe from Mrs. Fields Cookie Book that I used when I was young, that used marshmallows like this. Her recipe called for frozen marshmallows. *Lightbulb Moment*


I made these the day before the BBQ for Daisies. Then it rained the day of the event, so it was postponed for two weeks in the future. I froze the cookies. Two weeks passed, it rained again. So, these cookies were in the freezer for a full month before using. And they tasted as good as when they went in the freezer, so make them ahead if you need too!


**************
Happy Memorial Day everyone. Let's all remember our heroes this day. To my dad and my step-father in-law, (both former navy members and Vietnam veterans) thank you for all that you've done. I appreciate you!


Enjoy!


S'mores Chocolate Chip Cookies
Printer-Friendly Recipe


Ingredients:
2 sticks butter
1 cup granulated sugar
¾ cup light brown sugar
2 large eggs
2 teaspoons pure vanilla extract
3 ¼ cups all-purpose flour
½ teaspoon salt
1 teaspoon baking soda
1 cup chocolate chips
1 ½ cups chopped fudge-covered grahams (Keebler or store brand)
72 mini marshmallows (plus or minus depending on how many cookies you make), frozen

Directions:
1.    Melt butter in a microwave safe bowl. Pour into an electric mixer fitted with paddle attachment. While still hot, add both sugars and mix on low until combined. Let sit to cool for a few minutes.
2.    While butter mixture is cooling, combine flour, baking soda, and salt in a medium bowl. Stir and set aside.
3.    Turn mixer (with butter mixture bowl attached) on low. Add eggs, one at a time, mixing completely.  Mix in vanilla extract. Add flour mixture to the wet ingredients and mix until combined. Add chocolate chips and chopped fudge-covered grahams and stir to combine.
4.    Chill for 30 minutes to one hour, until cooled.
5.    Preheat oven to 350°. Form cookies using  a 2-tablespoon (medium) cookie scoop,Make a large indentation in the center and add two frozen mini marshmallows. Wrap dough around marshmallows and seal to combine. Bake for 10-12 minutes (depending on size). My cookies baked in 11 minutes. Let cool for 5 minutes, then remove from pans to cool completely.

Yield: 3 dozen


This recipe is linked with:


Labels: , ,

28 May 2011

Buttons

Do you read this using an RSS feed? (If so, thanks for subscribing!)  If you're using a reader, you probably haven't noticed my fabulous new buttons over there on the right.  Go ahead and click through to my site...I'll wait...you there? Great!

Let me introduce you to my new buttons. I wanted an easy way for my readers to follow me, but I wanted something cute.  So I made cookies, of course.


Now I have a button that will take you directly to my Facebook page (where you can 'like' and follow me):


There's one for Twitter (@crazyforcrust):


Even for RSS, if you happen to come to my actual site.  (RSS enables you to follow me in a reader, such as Google Reader, so my posts go to one place.)


I added an "email me" button too, in case you have a question or want to drop me a recipe suggestion or tell me how fabulous I am (just kidding!)


To make my buttons I made sugar cookies and topped them with royal icing.  The details are done with food writers.  If you haven't stumbled upon those yet, they are awesome! You can find them at craft stores like Michaels or kitchen stores like Sur la Table, or online.


Thanks for reading, and I hope you decide to follow me!

Labels: ,

26 May 2011

Word Card Cookies (A Thank You to All the Teachers)

In one week, my daughter will celebrate her last day of Kindergarten. Her last day as the "baby" of elementary school. Her last day of segregation. From now forward, she will eat with the other grades, play on a playground with other classes, and sit in a proper desk that is a regular size. She will be in school all day and have tons of homework and actual spelling tests. She will be in first grade. She will be, officially, a big kid.

Excuse me while I go have a good cry.

When Jordan started Kindergarten, she could write her name in capital letters. The J was always backwards. Always.  On a good day, she could recognize numbers up to 20. Usually she'd skip a few when reciting them.  She couldn't read. She could not write very many numbers or lower case letters.

Within a few weeks of starting school last August, she could write her name the "Kindergarten Way" (uppercase first letter, lowercase for the rest). Her J's turned around and stayed that way. She started recognizing lowercase letters and writing her numbers.

A couple of months into school she brought home her book bag for the first time. It was a ziploc bag with a reading book and log in it. Her first reading books were all picture-based. A page would say "I like trucks," and the picture opposite it would have a truck. The picture guided her reading. I don't know what level she was at, but it was low.  Last week I checked her book. She's at a 9. And she can read the words. She's still sounding some of them out, but she can read it. A whole book.

Those book bags also introduced us to word cards. Word cards are site words written on blue index cards and attached together on a ring. Every day we'd practice her words, painstakingly going through that ring of cards. Her first ring was small; it held less than 10 blue cards.

Each week she'd take her book bag back to school and do a reading lesson and switch out her book. Once a week she'd have a word card test, administered by a mom volunteer. During these word card tests the kids went through the stack of cards and, if they said the word quickly (knew it without needing to guess or sound it out), they'd get the corner clipped. Over time, the stack of little blue corners became a challenge for them. How many could they get? Would they get them all? How many new words would they get to bring home?

Jordan, who started out with less than 10 words last fall, now has 121 words clipped. It's truly amazing.

In January I took over one word card clipping day a week (out of two). When the other volunteer went on maternity leave in April, I took over both days. Last week I clipped the last of the cards. The year is wrapping up and the clipping has come to an end. I, being me, wanted to bring the class a special treat to let them know how proud I was of them. Immediately, I knew what I wanted to bring.


Word Card Cookies. I made them using my regular sugar cookie recipe. I tried a new Royal Icing recipe, from SweetSugarBelle and it was awesome. It worked great. The more I work with RI, the more patience I get. I had to wait a full 24 hours for the blue icing to dry before I could pipe the words. And I let it. I waited it out. My first few words were runny - the icing was too thin. I had to go back twice and add more powdered sugar to get the right consistency for piping words. But I had the patience to do it and the results were just what I'd wanted. I handed them out after school last week, and the teacher instructed the children that they had to read the word before they could eat it. And they did.


Which brings me to the point of this post. I want to send a heartfelt thank you to my daughter's teacher, Mrs. D, and her co-teacher, Mrs. O. Without them my daughter would not be reading. Or writing full sentences. Or adding and subtracting. You are amazing teachers who have an amount of patience that I can't even imagine having. You deal with so much every day and you still manage to teach our children the basic skills they need to survive in this world. My daughter is more than ready for first grade, thanks to both of you.

Thank you to all of the teachers out there. You all deserve a huge round of applause for all that you do. (You also deserve to make millions of dollars as a salary, but that's a whole other post.) You work harder than any parent (who is not an educator or related to one) knows. I know, I used to teach high school math. I know how hard you work. What you do is amazing. I appreciate you. So does my daughter. I hope this summer offers you a relaxing retreat before you have to do it all over again.

So thank you, from the bottom of my heart, for all that you've done and will do. You are the best.

*************
To make the Word Card Cookies you need:
Sugar Cookies, in a rectangle shape with the corner cut off
Royal Icing (recipe below)
Patience

Royal Icing #2 (from SweetSugarBelle)

Ingredients:
3 Tablespoons meringue powder
4 cups powdered sugar
6 Tablespoons Water (or 5 Tablespoons + 1 Tablespoon flavoring*)

Directions:
Beat all ingredients until icing forms peaks. This will take about 7-10 minutes on low speed with a stand mixer or 10-12 minutes on high speed with a hand mixer.

*SweetSugarBelle gives a great tip for Royal Icing: Flavoring! Reduce the amount of water by 1 Tablespoon and add 1 Tablespoon of extract THAT IS OIL FREE. OIL and Royal Icing do not mix. Pure vanilla or almond extract are two good additions, but you can do any flavor you want. Just make sure to check the ingredients list first to see that there is NO OIL.

After beating your icing until peaks form, transfer it to sealable containers (such as Tupperware), one for each color you are using. Add your coloring (if desired) and little bits of water until the consistency is thin enough to pipe but still thick enough not to run off the sides of the cookies. This will be your “edge” consistency. (Note: add a little to your pastry bag fitted with a #2 tip and test it. If it’s too hard to pipe, add more water. If it’s too thin, add some powdered sugar. If it doesn’t kill your hand and doesn’t run off the cookie, it’s good.) Edge your cookies and let them completely dry.

To flood the cookies, add enough water that the icing disappears back into itself when it drips off the back of a spoon. Transfer to a squeeze bottle and flood the cookies. Use toothpicks or an offset spatula to help fill in the little holes. If you’re having to spread a lot, your icing is too thick. You can add more water to thin it. Let this dry completely. It might even take overnight. Be patient, let this step take the time it needs!

You can store the royal icing overnight in the refrigerator, as long as it is sealed in a container.

If you are doing detail on top of the flooded cookies, like writing, make sure the consistency is stiff enough not to run. This may need some trial and error, so be sure to have a few extra cookies until you get the consistency right. Add powdered sugar or water to thicken/loosen as needed. Let the decorations dry completely before covering.

Source: SweetSugarBelle and Wilton

This recipe is linked with:


Button

Labels: ,

23 May 2011

Cake Batter Crispy Treats

I think I'm on a Crispy Treat Kick. What do you think? Like I said before, I like Crispy Treats.  But I like them more when they are "kicked up a notch" as Emeril would say.

So when I saw this post by Jessica at How Sweet It Is, I knew I had to try them. After making the Cake Batter Ice Cream, I have an open box of cake mix with nowhere to go. I mean, it's not like I can make the cake with it now, since I didn't take the time to measure each cupful of mix before I started (I wouldn't know how much to cut down on the eggs, water, and oil). So this gives me the excuse to make a lot more Cake Batter recipes. You really should check out Jessica's blog. She even made Cake Batter Cinnamon Rolls. Need I say more?


Delightfully crunchy and chewy at the same time, as all good crispy treats are. But with a hint of cake batter. And sprinkles. Isn't everything better with sprinkles? (Even my daughter is on that bandwagon. I had the nerve to serve her plain vanilla yogurt yesterday. *Gasp* She complained it didn't taste good without the sprinkles. I would have been annoyed had she not been totally right.)


When I was at the store buying Crispy Rice cereal, it was on sale so I bought two boxes. (I don't always buy brand name. Have you seen the price of cereal lately?) Then, when I got home I realized I already had bought a box elsewhere. So I have three unused boxes of crispy rice cereal in my cabinet. Hence the last three posts. And I've got a great idea for another flavored crispy treat I want to try. Stay tuned!

(This is what happens when your pantry is deep enough to hold 2 1/2 boxes of cereal. You forget what you've bought. It's why I can't do extreme couponing; I don't have enough neurosis organizational skill to reorganize my pantry every time I shop. Side note: have you seen that show? Crazy.)

Happy Monday! I hope you've added some sweetness to your day. I sure have (and it's only 10am. Hence my gym addiction).

Cake Batter Crispy Treats


Ingredients:

3 tablespoons butter

1 10-ounce bag of mini marshmallows

¼ cup yellow cake mix (the powder, not the actual batter)

6 cups rice cereal

¼ cup sprinkles


Directions:

1.    Melt the butter in a large saucepan over low heat. Add the marshmallows and stir until they begin to melt. Stir in the cake mix one spoonful at a time until it is combined. Add the cereal and stir until completely mixed with marshmallow mixture. Add your sprinkles and stir until combined.

2.    Line a 9x13 baking dish with foil and spray with cooking spray. Pour the cereal mixture into your pan and press flat. I like to spray my hands with cooking spray to do the pressing. Let cool completely before cutting into squares.


Labels: ,

20 May 2011

Cruchy Sweet Snacktime

So I haven't posted as much as I'd hoped this week. Time got away from me. My daughter had a special school schedule twice this week and I got nothing done. Please forgive me.

Today I got home from helping in her class and after doing all the things I had to do (i.e. the overflowing dishes) I had a half hour left free. I had no energy to write. Or edit photos. Or read email. I sat on the couch and watched the Real Housewives of New York read War and Peace.

I was hungry. I wanted something crunchy. Something sweet. We have no (good) sugar cereal in the pantry. No chips. So I got inventive. And what I created was so darn good I wanted to share it with you.

Yes, I take photos of my snacks. Doesn't everyone?


First, add a handful of chocolate chips and a spoonful of peanut butter to a bowl.


Melt in the microwave and stir.


Add some crispy rice cereal and stir.


Eat it warm. Oh. My. God. It is so good.

In fact, I'm feeling hungry again. Excuse me, I gotta go.

Happy Friday!

Labels: ,

18 May 2011

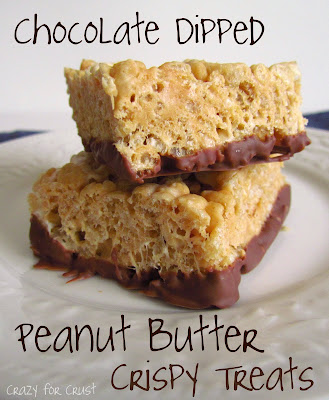
Chocolate Dipped Peanut Butter Crispy Treats

Well, I'm back with another peanut butter and chocolate recipe. What can I say? I really am addicted to those two flavors. I seriously think PB&C is the best flavor combination ever. And I think I just created my own acronym. PB&C. It's catchy. Don't you think?


I wanted to make rice crispy treats, but I wanted to jazz them up a little. I had a bag of peanut butter chips in the cabinet that was (sort of) still intact. I mean, I only opened it to taste them. To make sure they weren't rotten or nasty. Because that happens right? I'm not the only one who "tastes" the contents of her peanut butter chips? I just may have "tasted" them along with a handful of chocolate chips for dessert a few one night. Is that so wrong?

I followed the direction on the box for the crispy treats, but I added a few more marshmallows because I like them softer rather than too crunchy. The first batch of marshmallows I tried to melt had a problem. You might notice I said "tried to melt". Because they didn't. They browned on the stove. So I tried to melt them in the microwave. And they held their shape. I'm not sure what happened there. They weren't that old and they had been in a ziploc bag. Kind of freaks me when stuff like that happens.

Anyway, luckily I had more marshmallows in the cabinet. I'm never without marshmallows. (You never know when you'll want hot chocolate. And hot chocolate is just not the same without marshmallows!) I added the peanut butter chips to the melted marshmallow-butter mixture along with the cereal and they melted as I stirred. Then the mixture hardened and I cut it into bars. And that's where it got fun.


Peanut butter is delicious. Desserts made out of peanut butter are delicious. But, as I've said, nothing is better than PB&C. So I thought I'd dress up these crispy treats a little by giving them chocolate pants.

And they were yummy. Not too overly peanut buttery, but just right. I was wondering if one cup of peanut butter chips was enough, and it was. Combined with the chocolate, these treats were the perfect snack.

So, if you're like me and are looking for something to do with that half-empty bag of peanut butter chips you had to "taste-test", make these treats. Your kids will thank you. Your husband (or wife or significant other) probably will too. Unless he's like my dear husband. Who doesn't like crispy cereal or marshmallows. But that's the topic of a whole other kind of post.


Enjoy!

Chocolate Dipped Peanut Butter Crispy Treats

Ingredients:
½ stick butter (4 tablespoons)
50 large marshmallows
5 cups crispy rice cereal
1 cup peanut butter chips
1 bag (about 11 ounces) milk chocolate chips

Directions:
1.    Line a 9x13 inch baking pan with foil.  Allow the ends to wrap over the edges of the pan for easy removal. Spray with cooking spray and set aside.
2.   Melt the butter and marshmallows in a large microwave-safe bowl on HIGH (100% power) for two minutes, stirring after one minute. Remove from microwave and quickly add cereal and peanut butter chips, stirring until chips are melted and everything is combined.
3.   Pour mixture into prepared pan. Spray your hands with cooking spray and press the mixture until it is evenly distributed. Be careful not to burn your hands! Cool completely and cut into squares.
4.   Once your bars are cut, line two cookie sheets with wax paper.  Melt your chocolate chips in a microwave safe bowl. Heat in microwave on 50% power for 30 second intervals, stirring after each. Once the chips are melted completely, dip the bottom of each crispy treat into the chocolate. Place on the wax paper lined cookie sheet. Chill in refrigerator until the chocolate is solid, about 30-60 minutes, depending on how warm it is in your kitchen.

Yield: approximately 24 squares.

Source: adapted from the recipe on the side of the box of crispy rice cereal.

This recipe is linked to:


Button

Labels: , ,

16 May 2011

Oatmeal Scotchies


When I was a kid, I hated butterscotch. Detested it. My mom would make rice crispy treats and add a package of butterscotch chips and I wouldn't touch them with a 10-foot pole. But, as I've gotten older, my picky palate has improved.

I mean, I love Almond Joy candy bars now. Like, love to the nth degree. And I used to hate coconut more than I hated butterscotch. So I thought it might be time to give butterscotch another try.

Recently I needed yet another cookie for a potluck. I wanted something without chocolate for those (confusing) people who don't like chocolate. I knew I wanted to make an oatmeal cookie and that's when it hit me to try butterscotch again (as an adult).

These cookies don't disappoint. I made a double batch (doubling the ingredients works just fine) and gave some away as gifts. Everyone I gave them too came back at me with a resounding "those were awesome!" I took them to the potluck and had the distinct pleasure of watching people go back to the table for seconds (and thirds). I wish I could claim the recipe as my own, but I can't. It's an adaption of the "Vanishing Oatmeal Cookie" recipe off an old box of Quaker Oats. I'm not even sure if they include that recipe on the canisters anymore, but I've had it written down since I was a teenager. It's my go-to oatmeal cookie.


If you think you're not a butterscotch fan, give these cookies a try and see if they can change your mind. I know they changed mine!

Enjoy!

Oatmeal Scotchies
by Crazy for Crust
(Adapted from Quaker Oats)

Ingredients (3-4 dozen, depending on size)
  • 1 cup butter, softened
  • 1 cup packed brown sugar
  • ½ cup granulated sugar
  • 2 eggs
  • 1 teaspoon vanilla
  • ¾ cup all-purpose flour
  • ¾ cup whole wheat flour
  • 1 teaspoon baking soda
  • 1 teaspoon cinnamon
  • ½ teaspoon salt
  • 3 cups oats (quick-cooking)
  • 1 cup butterscotch chips
Instructions
  1. Preheat oven to 350°. Line your baking sheets with parchment paper or silpat liners.
  2. Mix flour, baking soda, cinnamon, and salt in a medium bowl. Set aside.
  3. In the bowl of an electric mixer fitted with the paddle attachment, beat the butter and sugars until creamy. Add the eggs and vanilla and beat well. Add the dry ingredients and mix until combined. Stir in the oats and butterscotch chips.
  4. Drop by tablespoonfuls onto your prepared baking sheets. I like to use a 2 tablespoon sized ice cream scoop for this so the cookies will all be the same size.
  5. Bake 10-12 minutes. Cool five minutes and then remove from pan to cool completely.
Powered by Recipage


This recipe is linked with:


Labels: , ,

12 May 2011

M&M Almond Chocolate Chip Cookies

Remember when I posted my mom's banana bread recipe a few days ago? And I talked about how that batter is the best raw batter ever (if you're into being a batter connoisseur, which I am)? I mentioned the #2 slot would go to a cookie recipe I'd post soon? Well.  Here you go, my friends. My chocolate chip cookie recipe. A.K.A "The best raw cookie batter ever."

You're welcome. I aim to please.


Chocolate chip cookies are one of those things like pillows and how you take your coffee and underwear: each person has their own personal preference. I hope that these cookies will become your preference. Because they sure are mine!

I'm not a huge fan of cookies that are greasy. I don't want to have to blot my food with a paper towel before I eat it. I like a soft center, with a solid exterior. I think that these cookies have managed to overcome all my pickiness on this matter. They are delicious! And the best thing about the batter is that it is so versatile. Just in the mood for chocolate chips? No problem. Want to add some nuts or mix-ins? Go ahead. They'll still taste great.


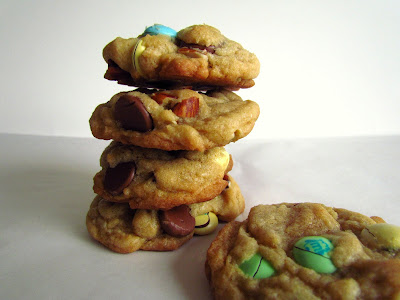
For this cookie, I wanted something more than just basic chocolate chip. I was taking them to a potluck and I knew that there would be tons of other cookies there, most likely Costco-bought packages of chocolate chip. So I added M&Ms, because who doesn't love M&Ms? I used the Easter plain ones, well, because honestly? They were on clearance. But next time I want to try using the pretzel ones.

What? You've never tried pretzel M&Ms? Oh, my friend. You haven't lived until you've tried Pretzel M&Ms. Go out and get some. Go out now. I beg of you.

Sorry, got sidetracked there....where was I? Oh, I also wanted nuts and was in the mood for almonds, so I added those. Add whatever kind you like or have on hand.


And, really. Try to get some of the cookies baked. Don't just eat the batter. It's hard, I know. But you'll thank me later.

Enjoy!

M&M Almond Chocolate Chip Cookies

Ingredients:
2 sticks butter
1 cup granulated sugar
¾ cup light brown sugar
2 large eggs
2 teaspoons pure vanilla extract
3 ¼ cups all-purpose flour
¼ teaspoon salt
1 teaspoon baking soda
1 cup chocolate chips
1 cup M&Ms (any kind)
1 cup chopped almonds

Directions:
1.    Melt butter in a microwave safe bowl. Pour into an electric mixer fitted with paddle attachment. While still hot, add both sugars and mix on low until combined. Let sit to cool for a few minutes.
2.    While butter mixture is cooling, combine flour, baking soda, and salt in a medium bowl. Stir and set aside.
3.    Turn mixer (with butter mixture bowl attached) on low. Add eggs, one at a time, mixing completely.  Mix in vanilla extract. Add flour mixture to the wet ingredients and mix until combined. Add chocolate chips, M&Ms, and chopped almonds; stir to combine.
4.    Chill for 30 minutes to one hour, until cooled.
5.    Preheat oven to 350°. Drop by tablespoonfuls onto parchment lined cookie sheets. Bake for 10-12 minutes (depending on size). Cookies made from my 2-tablespoon cookie scoop baked in 11 minutes. Let cool for 5 minutes, and then remove from pans to cool completely.

Yield: 3 dozen

This recipe is linked with:


Button

Labels:

10 May 2011

Cake Batter Ice Cream

I love ice cream. Who doesn't? It's cool, refreshing, and a great summer treat. When my husband and I got married, I received an ice cream maker as a gift. Back then I loved to cook and bake, but I wasn't up on all the gadgets, so I had registered for a basic, $25 Target model. I used it a few times and then it got put in a cabinet and I stopped using it. A few years ago I pulled it out, dusted it off and wanted to make ice cream. I think all those years of neglect had affected it badly, because no matter how long I froze the canister, it wouldn't churn out great ice cream anymore. Sad and dejected, I placed it back in the cabinet from whence it came.

A few weeks ago I found myself perusing the aisles of Bed, Bath, and Beyond with a $50 store credit. What could I get? That store (along with stores like Sur la Table and Williams-Sonoma) is like a candy store for me: so much I want but I can only choose a few items (or none, depending on my budget). My eyes landed on a Cuisinart Ice Cream Maker. It was only $48. I had enough to upgrade. So I brought home my new toy and promptly froze the canister.

The only thing I had to decide now was what flavor to make. There are so many choices (and believe me, I'll be trying them all). I decided to give a go at one of my favorite flavors.


Cake Batter Ice Cream. I love it. So much. My favorite cake batter frozen treat is actually gelato from a store near where we used to live in Arizona. The frozen yogurt shop down the street from us now has a pretty good one (which, of course, I add brownies to).  One of the blogs I love, How Sweet It Is, makes cake batter flavored everything, so I decided to give it a go.

I used the basic vanilla recipe that came with my ice cream maker. It's not an egg-based ice cream. Sometime I will try one of those, but I was too impatient this time to do that. I adjusted the recipe to lessen the sugar added because there is sugar in cake mix. I also lowered the fat content a bit, so I wouldn't feel guilty eating it. If I had to do anything different, I would add another 1/4 cup of cake mix next time, to give it even more cake batter flavor.

Now I keep my ice cream canister in the freezer, so when the urge hits I can make ice cream anytime. I will be sure to share my adventures in ice cream with you!

Enjoy!

Cake Batter Ice Cream

Ingredients:
1 cup heavy whipping cream
1 cup regular milk
1 cup nonfat milk
½ cup sugar
½ cup cake mix (from the box, powdered NOT the batter)

Directions:
1.    Make sure the canister to your ice cream maker has been in the freezer at least 24 hours (if your ice cream maker requires this step).
2.    Mix all the ingredients in a large bowl (I like to use a Tupperware bowl). Stir until the sugar is completely dissolved. Cover and chill over at least three hours or overnight.
3.    When ready to make the ice cream, turn on your ice cream maker. Remove mixture from refrigerator, stir, and add to the machine. Let it churn until thickened. (Refer to your ice cream maker for the approximate time it takes. It took mine about 15-20 minutes.)
4.    Place in an air-tight container and freeze until ready to use. Top with sprinkles, if desired.

Yield: 1 ½ quarts ice cream

Source: adapted from the recipe booklet in my Cuisinart Ice Cream Maker

This recipe is linked with:


Labels: ,

08 May 2011

Banana Bread

Happy Mother's Day!


When I was thinking about what recipe I could post for today, it hit me. Duh! I have to post this banana Bread recipe. Why? Because it's my mom's recipe, of course.

I grew up in the kitchen with my mom. We would bake cookies and brownies together. We'd make pies on Thanksgiving and cakes for birthdays. Sometimes on Saturday or Sunday mornings I'd awake to wonderful smells from the kitchen: blueberry muffins, coffee cake, or banana bread.

Sometimes I'd help her make this banana bread. I'll always remember those baking sessions, because it used a special kitchen appliance: the blender. We never used the blender or the food processor back then. Those were the appliances hidden on the top shelf in a back cabinet somewhere. I remember they even had their own little covers, perfectly sewn just for them.

I'd stand at the counter and we'd put the bananas and milk and eggs in the blender. Then I would add the baking soda and stand back, because we had added some vinegar to sour the milk and I'd wonder if it would bubble over. (It never did.) I'd get to press the buttons on the blender to make it run. Then we'd remove the lid and pour the wet mixture into the sugar mixture and the absolutely wonderful awesome smell would just hit me and I would want that bread right now.

I'm just warning you: the batter for this bread is amazing. I consider myself sort of a connoisseur of raw dough (I know I know, salmonella blah blah blah) and this banana bread batter is one of the best ones ever. (A close second goes to my chocolate chip cookie recipe, coming soon!)

I still remember standing with my mom in the kitchen, her in her purple bathrobe, preparing the pans with sugar for the batter. I always thought it was so cool she did that. (She'd grease the pan with butter and then, instead of flouring it, she'd use granulated sugar.) It gives the bread a nice sugary crunch when it's done baking.


When the bread would come out of the oven we'd all crowd around it just willing it to cool faster. Usually we ended up cutting it too soon, and it would crumble. But we didn't care. It was so good nothing mattered except eating that bread. My favorite part is that little top section (the peak of the rise of the bread) that doesn't totally bake through, so it's still a little wet, like batter. I'd always eat that part first.

So if you need a last minute breakfast for your mom today, make her some banana bread. I hope she loves it as much as I do.

How sad is it that this is the only picture I could find of my mom and I? And Jordan was in it and I had to crop out my dad? Mental Note: take good photos soon. And scan some old ones from her albums.

To all moms out there, Happy Mother's Day. And to my wonderful mom, thank you for being you. I love you!

Enjoy!


Ingredients:
1 cup sugar
1 stick butter, softened
2 tired bananas
2 eggs
7 tablespoons sour milk (To make sour milk: mix 6 tablespoons + 2 teaspoons milk with 1 teaspoon white vinegar and let sit for 5 minutes)
1 teaspoon baking soda
1 cup all-purpose flour
1 cup wheat flour
½ cup chopped nuts (optional)

Directions:
1.    Preheat oven to 350°. Grease and sugar your loaf pan (instead of dusting it with flour, use sugar).  Do not use cooking spray for this step! If you want to use cooking spray to grease your pan, skip the sugar. For muffins, use muffin cups (will make approximately 12 muffins).
2.    Cream butter and sugar in the bowl of an electric mixer (and hand mixer is okay too).
3.    Add the bananas, eggs, sour milk, and baking soda to a blender. Mix until liquefied.
4.    Pour half of the banana mixture into the butter mixture with 1 cup of flour and mix until just combined. Repeat with the rest of the liquid and flour. Do not overmix!
5.    Stir in nuts if desired.
6.    Try not to eat all the raw batter. It’s almost better than the finished product!
7.    Pour into loaf pan. Bake approximately 50-60 minutes. (Muffins bake in about 15-20 minutes, check after 10 minutes and then again after 15.)

Yield: 1 loaf

Source: My Mommy

This recipe is linked with:

Photobucket


Labels: ,