30 September 2010

It's a Pie! It's a Cookie!


It's a Piookie!

I have an obsession with cookies. All kinds: chocolate chip, sugar, peanut butter, mixed flavors, kid flavors. I love them. And I can NEVER eat just one.

I know. A crust obsession AND a cookie obsession. It's why I go to the gym everyday.

This is one of my favorite go-to cookie recipes. It's from the Mrs. Field's Cookie Book.

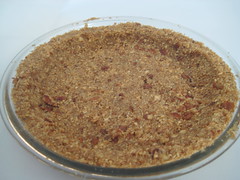
Now here's the thing. I love cutout cookies, but I hate rolling them out. It makes a huge mess. Flour, flour, everywhere. So making them into piookies seemed a natural alternative. Sure, it takes time to press them in the pans, but not as much time as it would take to roll them all out and clean up that mess.

So, naturally, these piookies start with what makes all cookies great:


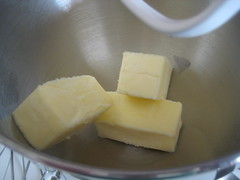
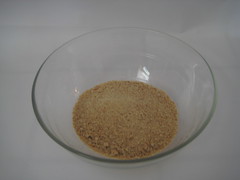
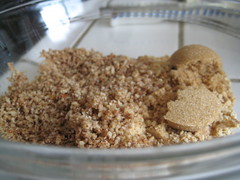
Butter. Lots of it. 3 sticks to be exact.

Other than that, its a super simple recipe. Butter, powdered sugar, vanilla, and flour.  Mix and then chill for about 15 minutes.


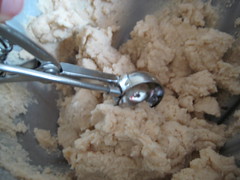
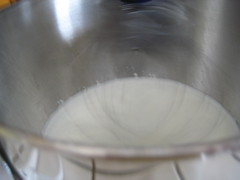
This gives you an idea of the consistency. I used my mini-ice cream scoop to measure out balls of dough, about 1 tablespoon per mini muffin cup. I sprayed mine with cooking spray, just in case.

  
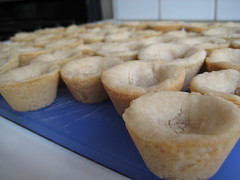
 I used my fingers to press the dough into the cup.  My index fingernail was short that day, luckily. You can also use the back of a wooden spoon, or anything that shape (even something thicker, like a wine stopper) to help you press the dough in.


When they came out of the oven, the dough had risen and it didn't look like a crust. While they were still hot I used the back of a wooden spoon to press the cooked piookies back into a crust shape, so the filling would fit.

  
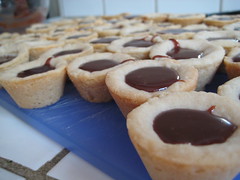
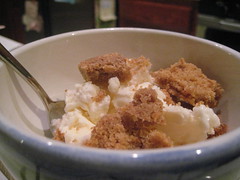
Mmmmm...can you taste them? Buttery sweet crumbly goodness. It was all I could do to NOT eat them at this point.  They still needed a filling: chocolate ganache.

The word ganache makes it seem like it would be difficult to make. But it's not! All you need is heavy cream and good chocolate. I love Guittard's chocolate chips or melt n' molds. They are smooth and taste SO good.

  
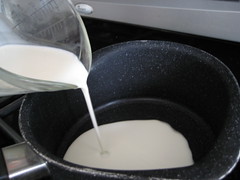
Heat the cream in a saucepan until it's just hot but not boiling. Watch it carefully!


Add in your chocolate chips and stir. Let sit for 15 minutes and stir some more. Then cool completely.  This ganache recipe creates a looser mixture than a regular ganache.


The filling has cooled and now we can fill our piookies! Whenever I am filling something I use a disposable pastry bag. Or you can use a ziploc bag.


If you want the filling to set, chill for an hour or so before serving. This recipe made about 40 piookies. I made them for a family gathering and assumed I'd have lots of leftovers to get rid of (or eat under the dark of night in front of the TV). I was wrong! They were all gone after our party. They are that good!

Labels: , ,

21 September 2010

So Simple...And So Yummy!

I guess now that I've got a Crust recipe out there, it means I need some filling to go with it (because one cannot survive on crust alone).

I wanted something simple and delicious. Something that wouldn't need baking because my house is already hot enough without turning on the oven. (I live near Sacramento. Even into September, the forecast for the weekend is in the 90s.)

I started thinking about that product that was in the stores awhile ago, Philadelphia Ready-to-Eat Cheesecake filling. Reminded me of my childhood; the box we used to create a no-bake cheesecake. I loved that stuff as a kid-I can still taste the distinct flavor.

But, I'm sure, that "distinct flavor" didn't constitute something very good for you. Doesn't the word "cheesecake" imply refrigeration? I still don't understand how a little packet of powder is supposed to be a cheesecake. So, on the hunt I went for how to make a from scratch no-bake cheesecake filling.

I came across several recipes on Allrecipes.com and adapted a few to make my perfect filling. Here goes!

It's really rather simple, actually. Only a few ingredients gets you to the finish line.

First, you need whipped cream. I love Alton Brown's Whipped Cream recipe, from FoodNetwork.com.


Make sure your bowl, beaters, and cream are all COLD before making your whipped cream. Add all the ingredients to the bowl and beat until you have...


Voila! Sweet whipped cream. Now put it back in the fridge while you make the rest of the filling.


All you need for the rest of the filling is cream cheese (of course), sugar, and vanilla. And yes, my vanilla bottle is well-loved.

Let your cream cheese soften (either microwave it for a few seconds, or, if you're more organized than me, take it out of the fridge a few hours before using).

Mix all the ingredients together and you have this:


Fold in your whipped cream gently and you're done!
Add to your Crust and chill for about an hour before serving.
(Or go grab a spoon. I did.)

This Filling recipe is very generic; it will go with all different Crust varieties. It's also very easy to embellish. Expect me to do that - watch for even more fillings soon!

Labels: ,

20 September 2010

"Better than Butter Pecan" Crunchy Crust

I love Butter Pecan ice cream. LOTS. And not just any butter pecan. The kind you get in Old Towns and small-town ice cream shops across America. (I know, it's probably just Dryer's, but for some reason "Old Town" ice cream just tastes SO much better.)

So when I was trying to come up with my first Crust recipe, Butter Pecan was the first thing that came to my mind. How to make pecans into a yummy Crust? Something that would pair well with lots of ice cream and different fillings? Well, I think I figured it out. So here goes!


There are only four simple ingredients: graham crackers, butter, brown sugar, and of course, pecans. Mmmm, I can taste that brown sugar now. Isn't brown sugar the best thing ever?


 Using your food processor, or a bunch of your knife skills, chop the pecans. While you're chopping, melt some butter and brown sugar in a skillet.


The trick to using nuts in any recipe is getting them properly toasted. The one thing you don't want is for your guests to get nut-mouth after eating your dessert! Add your chopped pecans to the butter and sugar melted goodness. Watch this mixture very carefully! Nuts burn VERY fast. (My first batch burned when I looked away for a minute, so I'm really not kidding about watching them closely!)

Then I spread the mixture out on a cookie sheet and bake it in a 350 degree oven for 5 minutes. (Just to be sure those pecans are nice and toasty!)


While the nuts are in the oven, grind up graham crackers in your food processor and melt your butter.


When the nuts come out of the oven, let them sit a minute. Now, here is where you have to make a decision. Chunky or smooth? Do you want larger chunks of pecans, or finely ground up ones? If you're like me and like things finely ground, go ahead and throw 'em back into the food processor for grinding.


Now mix all your ingredients in a bowl: your grahams, butter, and pecans. Add the rest of the brown sugar.


**Please note: Making this Crust will cause your kitchen to smell wonderful. Be prepared for family members to migrate from other parts of the house demanding bites.**

Dump this mixture into your pie plate and press until compacted. Don't be afraid to get your hands dirty! (It just means you get to lick them when you're done!) Bake and you're ready to eat!


 What do you mean, filling? I can't just eat it like this?

Filling suggestions for "Better than Butter Pecan" Crunchy Crust:
*Ice Cream (vanilla, butter pecan, dulce de leche, caramel, even pumpkin or eggnog, or any flavor you love)
*One of my "Easier than Baking" No-Bake Cheesecake recipes (coming soon!)

Or, you could be like me and eat it like this:


Printer Friendly Recipe

GPCJA57AZK4G

Labels: , ,

12 September 2010

Crusts Under Construction

Welcome to my Crust addiction!

I created this website because if there is one thing I love in the food world, it's CRUST. I can't get enough! I'm busy coming up with great recipes and practicing with my camera to get great photos for you. The next few months are pie-makin' months in my house so it's a perfect time of year to launch this blog.

Check back soon for some great Crust recipes (and fillings too!) In the meantime, here's what you have to look forward to...


Yes, it's a mini-pie! And mmmm....it's delicious. Recipes and more coming soon!