28 February 2011

Pretzel Rolls


I love soft pretzels. If I happen to be somewhere, like an amusement park, it's hard for me not to get one. Heck, even going to Target can be dangerous if I'm hungry (since they sell them in their restaurant). Awhile ago I was at Whole Foods and saw a loaf of Pretzel Bread. Genious! A soft pretzel you can use to make a sandwich. I think I ate the loaf of it in a day. (Um, it was small, yeah, very small.) Needless to say, when I saw this recipe for Pretzel Rolls in Food Network Magazine I ripped it out so fast I think I got a paper cut. They are a little bit of work, but totally worth it. I served them for sandwiches, but they'd even be good just as themselves, with a little butter, or even some cheese spread.


Next time I make them, I'll probably double the batch, so I'll get 8 instead of 4. Because there were 4 of us having lunch that day and that meant I didn't get to eat a second one. Such a pity.

Enjoy!

Pretzel Rolls

Ingredients
1 tablespoon active dry yeast
2 3/4 cups all-purpose flour, plus more for dusting
1 tablespoon sugar
1 teaspoon kosher salt, plus more for sprinkling
Vegetable oil, for the bowl
Cooking Spray
1/3 cup baking soda

1.  Put 1 cup warm water (110-115 degrees) in the bowl of a standard mixer and sprinkle the yeast on top. Set aside to bloom, 5 minutes. Meanwhile, combine the flour, sugar, and salt in a large bowl.

2.  Add the flour mixture to the yeast mixture and mix with the dough hook on the lowest setting until dough comes together. Increase the speed to medium and continue to mix until the dough is elastic and smooth, about 8 minutes.

3. Form the dough into a ball, place in a large oiled bowl and turn the dough to coat it with oil. Cover with a damp kitchen towel and let rest in a warm place until doubled in size, 30-35 minutes. Line a baking sheet with parchment or a silicone baking mat (or foil), coat generously with cooking spray and set aside.

4. Punch down the dough, then turn out onto a floured surface. Knead just until the dough is smooth and springs back when poked, about 1 minute. Divide into 4 pieces and form into oblong rolls (make sure they are all the same size). Place the rolls on the prepared baking sheet and cut four 2-inch diagonal slashes across the top of each. Cover with a damp towel or cover loosely with plastic wrap and let rise in a warm place until almost doubled in size, about 15-20 minutes. Meanwhile, preheat oven to 425 degrees and bring 8 cups of water to a boil in a large saucepan over high heat. (Caution: use a very large pot for this. I recommend one of those large pasta pots. Once you add the baking soda it's going to foam - a lot - and if your pot isn't big enough it'll foam over.)

5.Stir the baking soda into the boiling water (it will foam slightly, and continue to foam for the duration). Add 2 rolls and poach 2 minutes per side. Using a slotted spoon, remove the rolls, drain and place on the baking sheet, cut-side up. (I covered the baking sheet with paper towels to absorb some of the liquid.) Sprinkle with salt. Repeat with the remaining rolls.

6. Remove the paper towels, if you've used them. Re-spray the baking sheet with cooking spray, lifting each roll as you spray under it. Bake the rolls until golden, 12 to 15 minutes. Let cool slightly on baking sheet.

Source: Food Network Magazine/Guy Fieri January/February 2011

Labels:

16 February 2011

Another Adventure in Cake


We celebrated my daughter's 6th birthday last weekend. Well, we celebrated with her friends. She's a lucky girl; she's got another party with family this weekend (for her actual birthday). The theme of the party was "Disneyland," complete with character cut-outs, themed games, and cake.


Of course there was cake. There still is cake, 4 days later. Only now we have cake, and valentine treats, and candy. Oh my.

I'm buried in sugar.

And I love it.

I got one of those giant cupcake pans for Christmas, and I really wanted to use it. I wanted to do a Mickey Mouse hat on the top of the cake, and the top of the giant cupcake resembles that shape. But of course, you can't just have a giant cupcake cake. No way. You have to layer it on top of another large cake. (To maximize the leftovers, of course.)


I wanted the bottom half of the giant cupcake to resemble a cupcake liner, so I glazed it with a powdered sugar and milk mixture. In hot pink, of course. Is there another color for a 6-year-old girls' birthday? (Besides regular pink and purple?)


The ears and Mickey Mouse shapes on the sides of the bottom tier were made with frosting dough. I'm not sure where I originally found the recipe (I think it was Family Fun magazine) but it's a way to make decorations that look like fondant, but without having to buy fondant. It's super simple, made from canned icing and powdered sugar. I cut two circles for each ear and pressed them together with a Popsicle stick in between.

Frosting Dough
The cake and frosting were my favorite yellow and chocolate recipes. (One layer of each tier of each flavor.) There was chocolate filling and vanilla buttercream for the outer layers. (I used this chocolate cake and chocolate frosting recipe, the yellow cake from Annie's Eats and the vanilla buttercream from Baked Bree.) The bottom tier was made with two 9x9" square pans. I used double the chocolate cake recipe and one and a half recipes of the yellow cake, one batch of the chocolate frosting, and a double batch of the vanilla buttercream.

I think she liked it, because she kept opening the refrigerator to look at it before her party. :)


Warning: be careful when lighting candles on the bottom layer under a giant cupcake. The flame from the candles seem to melt the frosting on the giant cupcake. Not that this happened or anything...

Happy Birthday to Jordan!


Glaze for bottom of Giant Cupcake
Ingredients:
3 cups powdered sugar
1 teaspoon vanilla
3-4 tablespoons milk
Food Coloring, if desired

Mix powdered sugar, vanilla, and milk (slowly) in a large bowl. Tint with food coloring, if desired. Line a cookie sheet with foil and place the bottom of the giant cupcake upside down on a rack on the cookie sheet. Pour the glaze over the cake, using a spatula to spread on all sides. Let set until hardened, at least 15 minutes. You can also refrigerate to harden.

Frosting Dough
Ingredients:
1/2 cup white frosting (not whipped)
1 1/2 cups powdered sugar
Food coloring, if desired

Mix frosting and powdered sugar until combined, then knead with your hands until a smooth dough forms. Work in food coloring, adding more powdered sugar if dough is too sticky. Form into or roll out and cut into shapes. Refrigerate to set, then place on cake.

Recipes on CrazyforCrust.com
Sources: Frosting Dough from Family Fun Magazine and Giant Cupcake Glaze from Woman's Day.

Recipe Linked With:


Labels: ,

10 February 2011

Heart-Shaped Pop Tarts

I love Valentine's Day. As a young (single) adult I hated it (as do most young single women, I suppose). Once I met (and married) my husband I loved Valentine's Day because we'd go out to dinner, have a romantic evening, and I'd get flowers. Once my daughter got to be a few years, old Valentine's Day changed. It somehow became a kid holiday. Parents, do you know what I mean? Suddenly I was making heart-shaped everything: pancakes, sandwiches, muffins. Leaving out a Valentine surprise for her became as exciting as Santa Claus.


Each year I try to find something new and different to make for her to eat (heart-shaped, of course). A long time ago I came across a recipe for homemade pop tarts from Smitten Kitchen. They sounded awesome and as soon as I started thinking about what can (easily) be made into a heart-shaped goody, I thought of them. What's great is that you can do any flavor you want and you control the ingredients and the size.


Because we aren't huge "fruit in food" people around my house, I decided to make cinnamon brown sugar "heart tarts". The filling really does taste like the ones you buy in the store! I used a store-bought pie crust (gasp!) because I had several boxes in the freezer and little time to make dough. Next time I will for sure make the dough from scratch (from Smitten Kitchen's recipe).


In honor of National Nutella Day last week (yes, really) I bought a huge jar at Target. Because, um,...


I filled some of my tarts with it. Ate some from the spoon. Managed to finish baking with (most) of the jar intact.


You can freeze these pop tarts to save for later. And, if you have leftovers or want to bake the day before you need them, pop them in the toaster to warm. My daughter will for sure be getting these on Valentine's Day morning. (And so will I!)


Enjoy!


Easy Pop Tarts
Use whatever shape you want to personalize your treat!

Ingredients:
1 box refrigerated pie crust (2 crusts)
1 egg

For cinnamon brown sugar filling:
½ cup brown sugar
1 teaspoon cinnamon
4 teaspoons flour

For Nutella filling, you will need about 1 teaspoon per pop tart, depending on size. Buy yourself a jar, it’s awesome!!

Unroll your pie crusts and cut out desired shapes. I used hearts that were about 3 ½ inches. Be sure to have an even amount (one for the top, one for the bottom). Re-roll any scraps if needed.

Mix together your filling ingredients in a small bowl.

Beat your egg in another small bowl. Lay out half of your crust cut-outs. Brush the entire surface lightly with the beaten egg. Place about 1 teaspoon (depending on the size of your tart) of filling in the center of the bottom crust. Leave an small edge around the sides for sealing. Place the top crust over the filling and press to seal. Use a fork to pinch closed. Poke a few fork holes in the top to allow steam to escape.

Let refrigerate for about 20 minutes. Preheat your oven to 350°.

Line a baking sheet with parchment paper and bake your pop tarts about 15-20 minutes, depending on size. Let cool and enjoy.

To store for later, place pop tarts in a single layer on a wax paper-lined cookie sheet and freeze until solid. Then transfer to a freezer safe container until ready to use. Defrost and bake according to above directions.

Toast already baked pop tarts to reheat (watch that they don’t burn).

Source: Smitten Kitchen
Printed at CrazyforCrust.com

Labels: , ,

07 February 2011

Valentine's Day Cake Balls


Have you ever heard of a cake ball? If you haven't you're in for a treat. They are exactly what they sound like: little balls of cake. Except for one thing: they are dipped in chocolate. Yes, you heard me right. Cake and chocolate, like a truffle. I'll wait while you go get a napkin to clean the drool off your computer.


I'd never heard of these delightful concoctions until about a year ago, when I discovered Bakerella. If you haven't been to her website, you really should check it out. She started out making cake balls and then started making cake pops (way before Wilton jumped on the bandwagon, I really hope they've sent her a thank you card). Her pops are truly works of art.


Like truffles, cake balls take time to make. But they are so good! A hard chocolate shell that collapses when you bite into it because of the soft cake and frosting mixture inside. They are worth the time spent, I promise you that. And the ingredients couldn't be simpler: cake, frosting, and chocolate.


You start with a baked cake.  You can use your favorite cake recipe or a box mix. I've even made them before with part of a mix (I had made one round cake for a birthday and had one left, so I made cake balls. If you did this you'd just have to alter how much frosting you use.)


Here comes the fun part. Crumble the cake in a (very) large bowl. (You really should use the largest bowl you can unless you want to be vacuuming crumbs off your counters and floor, or yelling at your dog to "STOP EATING THAT RIGHT NOW IT'S CHOCOLATE AND YOU'LL GET SICK" like she can actually understand your words.)


Mix in your frosting. Start with 3/4 of the can and work up to the full can. You can use your hands or a large spoon. To test for consistency, try to squish it together. If it sticks, you're good. It becomes wetter looking also, not crumby.


Scoop out balls of the cake mixture onto a parchemnt or wax paper lined cookie sheet. I like to use a cookie scoop for this. Once it's all scooped out, go back and roll them into better balls. You'll get about 60 balls, depending on size.


Refrigerate for about 20-30 minutes (or longer if you want) to set. When you're ready to dip, melt your chocolate. You can use the blocks of bark they sell at the grocery store, Wilton candy melts, or chocolate chips. My favorite thing to use (for any chocolate candy recipe) are Guittard's Melt 'n Molds. They taste AWESOME. (Guittard also makes chocolate chips - my favorite.) It's harder to find Guittard's Melt 'n Molds when it's not Christmastime, but you can check them out here. Whatever type of chocolate you use, you need about 24 oz to do the whole batch (buy a little extra, just in case).

I like to do my chocolate in batches; about half or a third at a time. I dip the cake balls until I'm out of chocolate and then melt more. Water ruins chocolate and I've had times (not just with cake balls) where I've melted all my chocolate, dip a few items, and the chocolate seizes because there was some moisture somewhere. By doing it a little at a time I don't ruin all my chocolate if this happens.


To keep your chocolate warm and melted, I preheat my electric griddle to it's lowest setting (about 200 degrees) and place two thick kitchen towels on top. Then I place my chocolate in it's microwave safe Tupperware bowl on top and dip from there, stirring occasionally. Dip, pick up with fork, tap tap tap, wipe off excess, repeat.


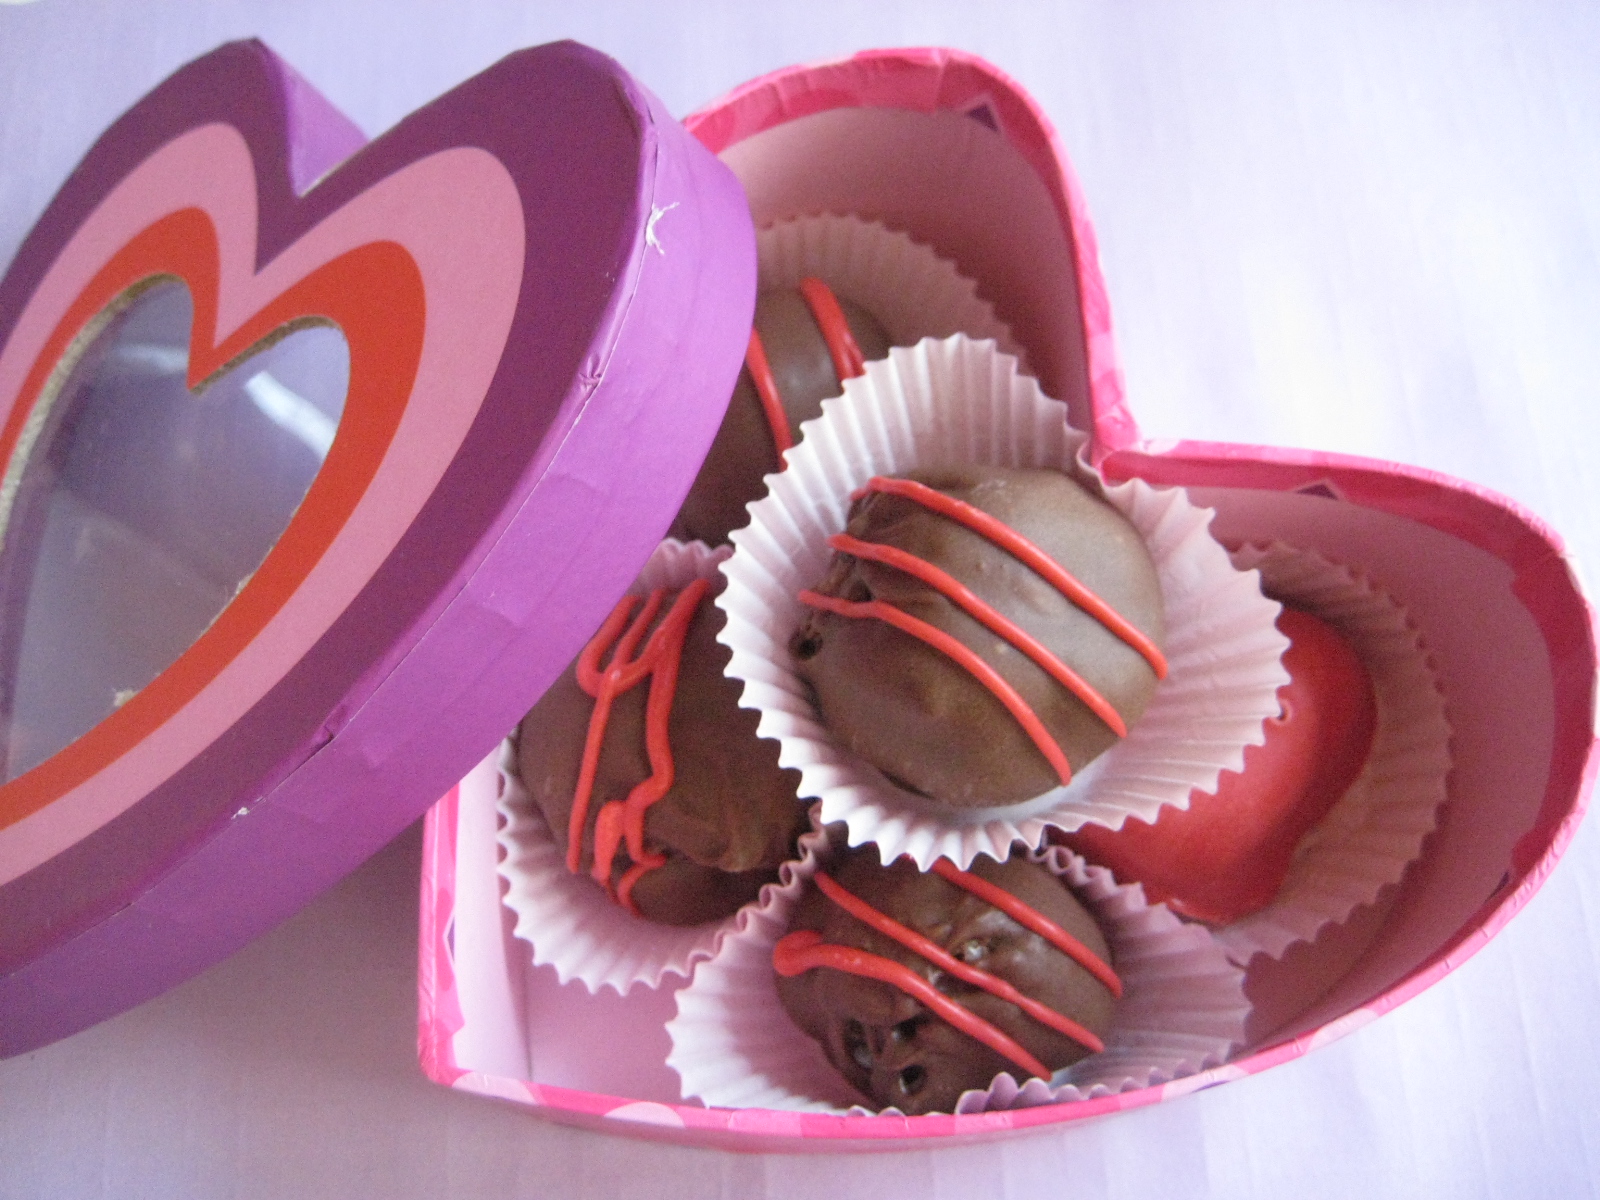
Once the balls are dipped, refrigerate until set. You can eat them this way, or you can decorate them. Decorating is the fun part; the sky's the limit! Use more chocolate and some sprinkles, drizzle them with melted white chocolate or other colors of the Wilton Melts. For these Valentine Cake Balls I used red Wilton Melts. I melt them the same way I melt chocolate (in the microwave) and then put in a little squirt bottle and decorate the tops. You can also use a zipper-top bag or pastry bag, or a fork to achieve the same thing. Have fun with it!

I used a silicone heart-shaped ice mold (from IKEA) to make the heart shaped cake ball.

And you know the best part about these cake balls? You can freeze them! Ahead of time! For using at a later date! (Like, say, when you've got 20 kids coming over for a birthday party two days before Valentine's Day and you're making a large from-scratch tiered cake for the birthday girl and you don't want your head to explode the day after when you try to sit down and make 60 cake balls for Monday? I'm just sayin'.)

Or they'd probably be good straight from the freezer for a midnight snack. Not that I'd know.

Enjoy!

Cake Balls
Decorate these for whatever occasion you need them for! They are very versatile.

Ingredients:

1 9x13 cake, prepared (from your favorite recipe or box mix)
*I've always used chocolate and have seen recipes using red velvet. I've never tried vanilla.*
1 can vanilla frosting (not whipped)
24oz + a little extra of chocolate melts, bark, or chips (milk, dark, or even white)
More chocolate (any kind), colored melts, and/or sprinkles for decorating

1. Once your cake has cooled completely (you can even bake it the day before), crumble it into a very large bowl. Mix in the frosting (starting with about 3/4 of the can, adding more as needed) until completely incorporated. The mixture should stick together if you press it in the palm of your hand.

2. Scoop out your desired size balls onto a wax or parchment lined cookie sheet. I find that a small cookie scoop works best for size and uniformity. Then roll each ball between your hands to create a better shape.  Chill for at least 20 minutes.

3. Melt half your chocolate, either in the microwave or in a glass bowl on top of a pot of simmering water. (I prefer the microwave, in a sturdy Tupperware bowl.) If you want to keep your chocolate warm during dipping, preheat an electric griddle at about 200 degrees and cover it with two thick kitchen towels. Place your melted chocolate in its bowl on top of the towels during dipping. Stir occasionally. When this runs out, melt the remaining chocolate.

4. Dip your cake balls in the chocolate and place carefully onto another wax or parchment lined cookie sheet. I use a spoon and a fork for dipping: a spoon to cover the ball and a fork for removing. Dip, pick up on fork, tap on the side of the bowl, wipe off excess chocolate from under the fork with the spoon, then move to prepared cookie sheet. I call it the "dip, tap tap tap" method. Very scientific.

5. Chill your balls until hardened. It won't take long. Decorate with more melted chocolate and/or sprinkles or another color of candy melts.

You can freeze them for later use. To freeze, place so they are not touching on a cookie sheet and place in freezer for about 2 hours. Then place in a seal-able container, separating the layers in wax paper. Seal and freeze until ready to use.

Yield: about 60 cake balls

Source: Bakerella
Printed at Crazy for Crust

Labels: ,

03 February 2011

Super Bowl Snacks III (Cinnamon Sugar Tortilla Chips & Chocolate Sauce)


If you haven't already guessed, I love sweets. A lot. Sure, I like me a bag of chips now and again, but usually when I go for a snack it's got sugar in it. So my sweet tooth was feeling left out of the Super Bowl Snack planning.


Chips and dip are a staple for any party, especially one involving football. I don't know the statistics, but I have a feeling that the Super Bowl is like Black Friday for the chip companies. I have no idea why this recipe popped into my head yesterday. Maybe it's because I love chocolate or because my daughter had cinnamon toast for breakfast. I'm not sure, but you'll be glad it did.


Cinnamon sugar tortilla chips with a chocolate dipping sauce. Amazing right? Perfect party food for those of us who hit the dessert table first. I'm not sure where I originally found this chocolate syrup recipe (it was in my documents file with no author) but it's super simple to make. And I added some cinnamon to it, to tie it in with the chips.  Did you know it's really easy to make homemade tortilla chips? After getting over my fear of the hot oil, it was a cinch. And when they come out oily and hot, the cinnamon sugar sticks wonderfully. They're like a churro, but easier to make.


Your sweet tooth will thank me. Your thighs, maybe not so much. (Mine have been mad at me since before Christmas.)

Happy Football!

Cinnamon Sugar Tortilla Chips with Chocolate Sauce

For the Chocolate Sauce
Make the chocolate sauce a day or two ahead – saves time and lets it cool and thicken properly.

1/2 cup Hershey's Cocoa Powder
1 cup Sugar
1 cup water
¼ teaspoon cinnamon (optional)
1 teaspoon Vanilla
dash of salt

Combine cocoa, sugar, cinnamon (if desired) and salt in a saucepan. Add water, and mix until smooth. Bring this mixture to a boil. Allow it to boil for one minute (be careful this does not boil over.) Remove from heat, cool for a few minutes. Then stir in your vanilla. Cool about 20 minutes and place in a sterilized jar or Tupperware. Refrigerate overnight. Makes about 2 cups.


For the chips:
10 corn tortillas, each cut into 6 triangles
½ cup sugar
¼ teaspoon cinnamon
3 cups vegetable oil

Mix the sugar and cinnamon in a small bowl and set aside.

Heat your oil in a large skillet (I used a wide 3 quart pan) over medium heat. It will take about 8 minutes or so for it to become the right temperature. While your oil is heating, line a cookie sheet with paper towels.

Drop a small piece of tortilla to test the temperature – if it sizzles right away it’s ready. Fry your tortillas in batches (be careful not to overcrowd your pan). Cook about 3 minutes each batch, until they are golden. Remove with a slotted spoon to the paper towel lined cookie sheet. Before adding the next batch of chips to the pan, sprinkle the newly cooked ones with a few teaspoons of the cinnamon sugar mixture.

Continue frying the chips and sprinkling them with cinnamon sugar until all your tortillas are used. (I did about 4 batches.)

*Be very careful when working with hot oil. It can burn you very badly, and catch fire very easily. DO NOT move your pan during cooking and work very carefully.*

Serve your chips with the chocolate dipping sauce on the side. Store unused chips in a Ziploc bag for a day or two. Chocolate sauce should last a few days in the refrigerator. Use extra chocolate sauce for ice cream, coffee, or a midnight snack.


Printed at CrazyforCrust.com


Chocolate Sauce on FoodistaChocolate Sauce

Labels: , , , ,

01 February 2011

Super Bowl Snacks II (Green Bay Grilled Cheese)

In honor of all things fair and equal, I figured I should come up with a Super Bowl snack for Green Bay.  The first thing that came to mind was, of course, those cheese-head hats they wear. Google "food traditions" and "Green Bay" and you quickly discover they like a few things a lot in Wisconsin: beer, brats, and cheese. I immediately thought of a grilled cheese sandwich. They're easy, delicious, versatile, and they make great party food.


Now, my daughter would prefer just cheese and bread, but I wanted to mix it up a little. While making sausages with peppers and onions for dinner the other night it popped into my head: grilled cheese with peppers and onions. Salty from the cheese, sweet from the peppers and onions. I also decided to add pesto as the sauce for the bread. I love using pesto on sandwiches. And, of course, the star of the show: sharp cheddar cheese.


This would make a great meal (we had it for dinner) or a great finger food for a party. And the great thing about grilled cheese sandwiches is you can make them however you want. These are a great vegetarian addition to a carnivore-laden Super Bowl party spread. Don't like peppers? That's okay, leave them out (plain grilled onions would be awesome too). Use sun-dried tomato pesto instead of regular. Add sliced turkey (obviously no longer vegetarian, but hey, you could make two kinds). Or, in honor of Green Bay, add sliced grilled brats (that were soaked in a beer bath, of course). I'm getting a vision for my next party: a grilled cheese bar. So many possibilities!


Go Packers!

Green Bay Grilled Cheese
Wisconsin is known for its cheese – and the Green Bay Packers are known for their cheese-heads. Make this gussied up classic to celebrate Green Bay in the Superbowl.

Ingredients:

1 tablespoon olive oil
2 red peppers, sliced
1 medium yellow onion, sliced
½ teaspoon sugar
½ teaspoon salt
¼ teaspoon Pepper
8 ounces sharp cheddar cheese (low-fat is fine)
1 tablespoon pesto (or thereabouts, if you like more, use more; if you like less, use less)
10-12 slices really good sliced sourdough, depending on size (or your favorite bread)
Butter, for coating sandwiches

1.       Heat a nonstick skillet over medium heat. Add peppers and onion and cook about 2 minutes. Sprinkle with sugar, salt and pepper. Toss to coat. Cover and cook for about 8 minutes, stirring every 2 minutes. Remove cover, reduce heat to low and let liquid evaporate and veggies brown.  Remove from heat. (This step can be done the day ahead. Refrigerate peppers and onions until ready to use.)
2.       Preheat griddle or frying pan. Slice cheese and set aside. Spread each slice of bread with a thin coat of pesto. Assemble sandwiches with cheese and peppers. Spread tops of sandwiches with butter. Place butter side down on griddle. Cook until golden. Repeat on remaining side.
You can also do this in a panini maker or sandwich press. Just butter both sides and press until they are golden brown.
3.       Cool slightly, slice before serving. This will make 4-6 good sized sandwiches, or you can slice them thin and serve as an appetizer.

Yield: 4-6 large sandwiches or about 12 small finger sandwiches, depending on bread size.

Recipe by Dorothy @ CrazyforCrust

Labels: , ,