08 August 2011

Roasted Zucchini Pizza (with Homemade Sauce)


{First off, did you read about my first giveaway? Go check it out! It's open until this Friday!}

Now on with the matter at hand...

I have zucchini growing out of my ears.

Well, not literally. But seriously, there is mega-zucchini goings-on here in the Crazy for Crust household.

In the last two weeks I have made chocolate zucchini muffins, zucchini pizza, zucchini bars, and stuffed zucchini (recipes forthcoming). I have used zucchini in my Summer Salad (twice). I have stir-fried zucchini and put it in cous cous and turkey burgers.

And I still have five good sized zucchinis in my crisper drawer. Five.

This week I will do one or all of the following: (a) give some zucchini away, (b) make zucchini oatmeal cookies, and/or (c) dream about a monster, life-sized Santoku knife-weidling zucchini chasing me through the streets of San Francisco.

Needless to say, this is the first of several zucchini recipes I will be sharing with you.

This one comes in the form of a pizza. And, stop right there, don't leave. If you just were about to click the little red "x" because "Ewww!!! Zucchini doesn't belong on pizza!!!" stick with me for a minute. It's really good. And what was even better? The sauce.

I've never made my own pizza sauce before. {Gasp.} I've always used Contadina or Target brand or whatever was on sale. But never again people. Never again. Now that I know how easy it is to make my own pizza sauce, I'm doing it always.


Usually, my favorite thing about pizza is the crust. (Really, I'm sure you had no idea.) But this pizza? The sauce was the star. Even my daughter loved it. (And this from a girl who usually makes her place at the table look like a murder scene with all the pizza-sauce wiped napkins she uses because she "doesn't like sauce.") There was not one red sauce-smeared napkin to be seen anywhere. And that, my friends, is the best endorsement ever.

Make your own pizza sauce. Roast some zucchini and throw it on top with all your favorite toppings. Pizza + Vegetables all in one bite. Perfect!


Enjoy!

(Note: There is a print link embedded in this post. Please visit the post to print.)

Zucchini Pizza (with Homemade Sauce)
Sauce recipe from Baked Bree

Ingredients:
For the sauce:
1 (28-ounce) can whole peeled tomatoes
1 tablespoon olive oil
1 teaspoon red wine vinegar
2 garlic cloves
1 teaspoon salt
1 teaspoon dried oregano
1/4 teaspoon freshly ground pepper

For the pizza:
Pizza Crust (either homemade or store-bought)
Mozzarella Cheese, shredded (as much or as little as you like)
1 medium zucchini for each pizza (if you are making more than one)
Other toppings you like

Directions:

  1. To make the sauce, add all ingredients to a food processor and pulse until smooth.
  2. Preheat oven to 400 degrees. Slice zucchini and place on a foil-lined baking sheet sprayed with cooking spray. Spray or drizzle zucchini with olive oil, salt and pepper. Cook for about 10 minutes. (This can be done ahead of time.)
  3. Stretch out your pizza dough to desired size. Top with sauce, cheese, and roasted zucchini (as well as other toppings you choose). Bake according to your pizza crust directions.
Yield: the sauce makes a lot. I made two pizzas (1-lb of dough each) and froze enough sauce for two more pizzas.


This recipe will be linked with Savory Sunday (The Sweet Details) and Mingle Monday (Add a Pinch).

Labels: , ,

10 June 2011

Dessert Pizza (Cooking with Kids, week #1)


Normally, I do all of my baking while Jordan is at school. I find it's just easier that way; I can go from baking to cleaning to photographing without worrying that I'm neglecting her or that she's watching too much TV. It's quiet and I can take the time to photograph and make recipe notations while I work. I've got a schedule and a system for it all.

But all of a sudden I realized something. Something important. Something that was going to disrupt my schedule.

Summer vacation. Endless days of heat and no school. NO SCHOOL. Weeks of finding outings for Jordan so she doesn't make my head explode get bored. Let's just put it this way: Jordan is a very active, very full-of-energy only child. If I want to do anything that's not entirely with her, she's usually watching TV, because that's just how she is.

So I had a brainstorm the other day. Why not try and include her in my baking this summer? Why not try and find some easy, kid-friendly recipes she will have the patience to help with? It'll create a fun activity she and I can do together. I can let her drive the ideas so she can have some ownership of them. And I can blog about it all, of course. Because I know some of you out there are in the same boat. Summer vacation is awesome...for about a week. Then the kids get bored. If you're like me, you take in as many additional kids as you can as often as their parents will give them to you, for sanity's sake. Cooking with Kids can be a fun addition to any parent summer survival guide.

So here we go, Cooking with Kids, week #1: Dessert Pizzas.

Jordan did this with a friend who was over for dinner and a movie. I thought they would have fun making their own dessert. Of course, I had planned it as being this whole drawn-out thing, and it took them about five minutes, but they had fun anyway.

The pizzas are made with actual pizza dough. Use one pound of your favorite pizza dough, homemade or store-bought. This will make about 4-6 dessert pizzas, depending on the size you make them. Pre-bake them and let them cool a bit so the kiddos don't burn their fingers.


Gather all your pizza ingredients: melted chocolate chips for the "sauce" and things like M&Ms, jelly beans, or marshmallows for the toppings.


Give the kids a basting brush and let them paint the pre-baked crust with the chocolate sauce.


Then let them decorate their pizzas as they please. You could use anything for toppings - just raid your pantry. I bet there is still some Valentine's Day/Easter/Last Day of School candy in there you can use.

Once the kids are done decorating you can slice the pizzas and serve them. Or, if you want to puff up marshmallows or melt some extra chocolate on top, heat them in the oven for just a minute or two. Any way you serve these, the kids are going to love them. It's a sweet treat and they helped make it - how could they not enjoy it?  I hope your kids love this idea as much as Jordan did.

Happy Summer!


Dessert Pizza
Printer-Friendly Recipe


Ingredients:
1 pound pizza dough (homemade or store-bought)
1 bag chocolate chips
M&M's, marshmallows, jelly beans, or other candies for decorating


Directions:
  1. Preheat your oven to 400 degrees. Line two baking sheets with parchment paper. 
  2. Divide your pizza dough into 4-6 individual pieces (depending on the size you wish to make them). Roll them out into a circle. Place on the parchment lined cookie sheets and bake until done, about 5-8 minutes (or according to your package directions).
  3. Melt your chocolate chips in a microwave safe bowl. Assemble all your "toppings".
  4. Paint the pizzas with the melted chocolate and top it with assorted candies. If you wish to melt the candies, bake for an additional 1-2 minutes. Slice and serve to happy kids.
Yield: 4-6 individual pizzas

Source: idea from Food Network Magazine

This recipe is linked with:


Labels: ,

04 May 2011

Mexican Pizza

I love Mexican food. It's one of my favorites. Actually, I think it is my favorite (in a two-way tie with Italian food). I could eat some type of taco, burrito, or enchilada every day of the week. When I do my menu planning I find myself struggling to not to make Mexican food recipes every day. Because I would, I love it that much.

For this Cinco de Mayo recipe, I decided to marry my two favorite cultures into one dinner: Italian and Mexican. It even has a Crust. Be still my heart.


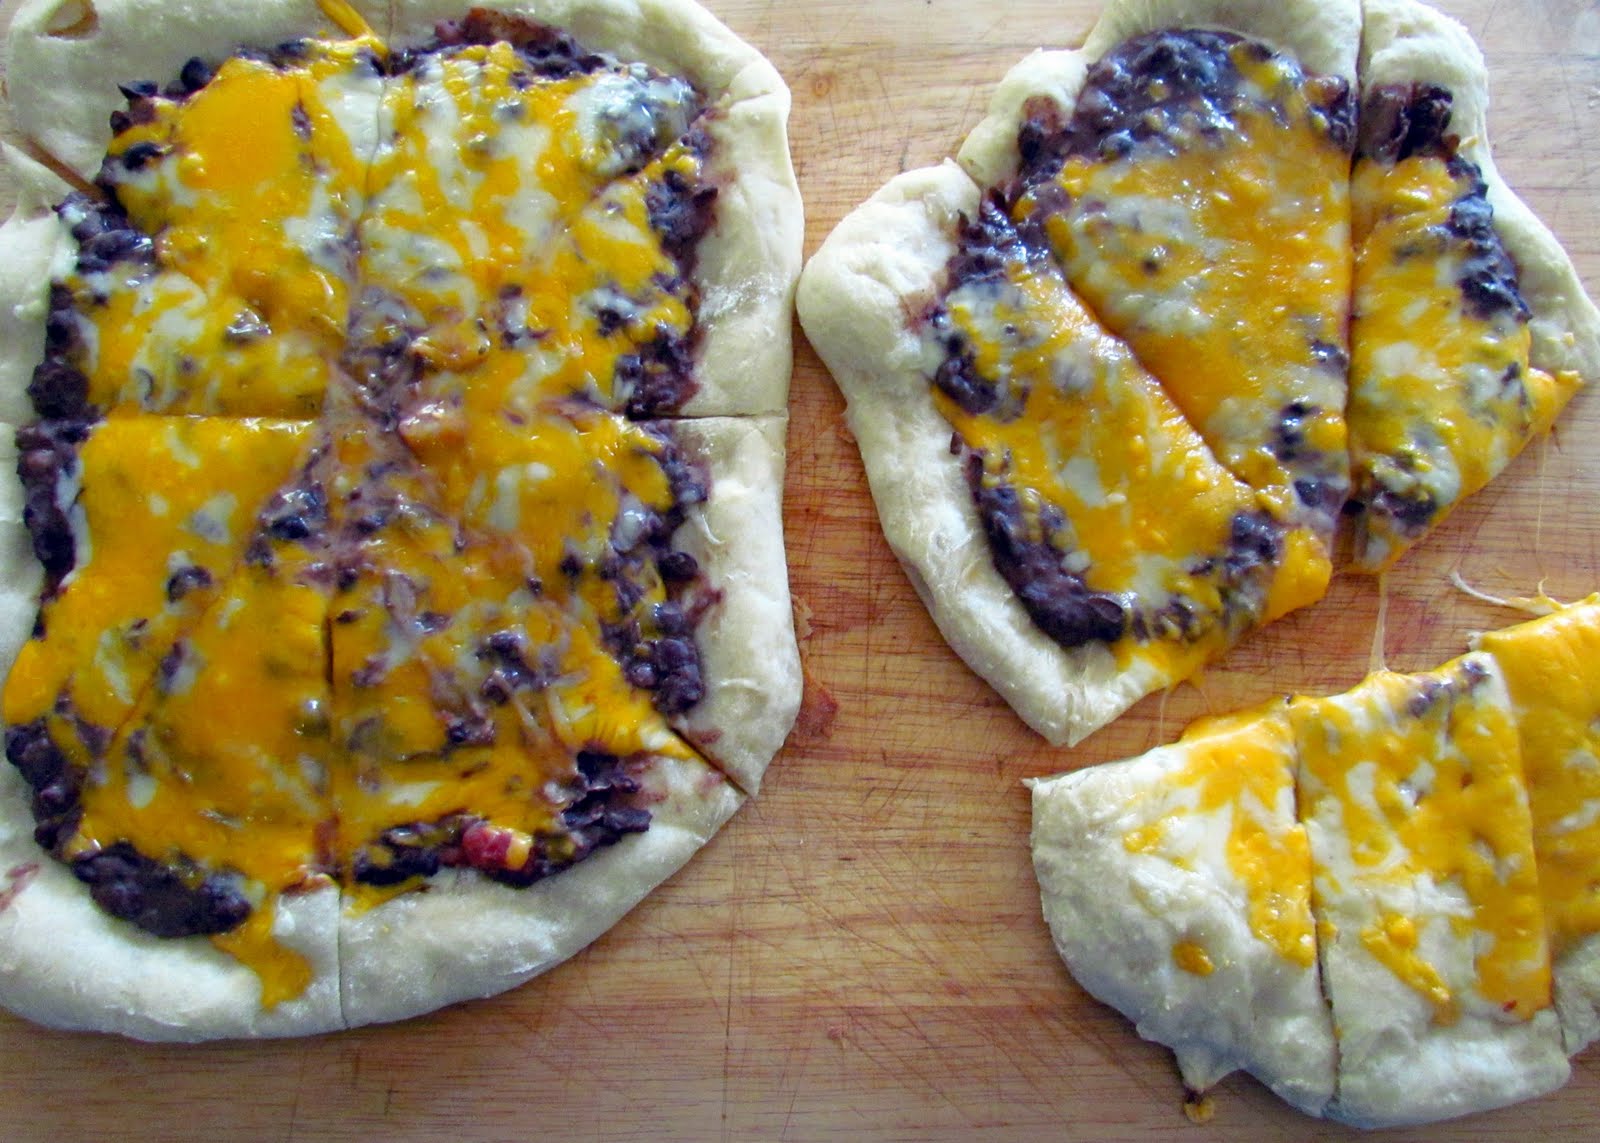
It's a pizza with Mexican flavor. A Mexican Pizza. And it was so good.

I started with a Crust recipe I'd never tried before. I saw it on Baked Bree. The recipe was for Overnight Pizza Crust and it was just that; it proofed in the refrigerator overnight.  I usually use my standard crust recipe when I make pizza, but I wanted to try something new and I'm glad I did. The flavor was awesome. The only complaint I had was that the dough was VERY wet and somewhat hard to work with, but totally worth it. Of course, when making this pizza, you can use whatever crust you want. You can even use Boboli or a canned crust if you like. The overall idea of the recipe is super simple and can be customized to your liking.


Instead of red pizza sauce, I use refried beans mixed with a little salsa for kick. Let me tell you, I can eat an entire recipe of those beans in one sitting all by myself. They are that good. Like regular pizza, it's coated in cheese and delicious. (That part down in the right-hand corner? It's the bean-free section for my picky daughter who won't eat beans. Or anything except bread and cheese.)

You can top your pizza with whatever you like: shredded lettuce, tomatoes, onions. Serve it with the usual Mexican food accompaniments: salsa, sour cream, and guacamole. Then grab yourself a few slices and watch it disappear quickly!

Happy Cinco de Mayo!

Mexican Pizza

Ingredients:
1 recipe Overnight Pizza Crust or your favorite pizza dough
1 can black beans
2 cloves garlic
1 teaspoon vegetable oil
¼ fire roasted salsa
2 cups cheddar cheese, shredded
2 cups Monterey Jack cheese, shredded
Shredded lettuce, tomatoes, guacamole, sour cream, and salsa for garnish

Directions:
1.       Add your vegetable oil to a medium saucepan over medium heat. Add your garlic and cook for about one minute. Add the can of baked beans (including the liquid). Stir to combine with garlic. Using a potato masher, mash the beans to your desired consistency. Continue to cook over medium-low heat until some of the liquid evaporates, about 5 minutes, stirring occasionally. Stir in salsa. Turn off heat and set pan aside.
2.       Preheat your oven to 450 degrees. If you are using the Overnight Crust recipe, place your cookie sheets in the oven to preheat. Separate the dough into two balls and press out onto parchment paper with your fingers.
3.       Cover each crust with half of the bean/salsa mixture. Top with cheese. Place on preheated cookie sheets and bake for 10-12 minutes until crust is browned and cheese is melted. Remove from oven and cool for five minutes before cutting.
4.       Cut into slices and top with shredded lettuce and chopped tomatoes. Serve with sour cream, guacamole, and additional salsa.

Yield: Serves 4-5

Source: Overnight Pizza Crust recipe from Baked Bree

Labels: , ,

29 March 2011

"Pizza" for April Fool's Day

When I was a kid I hated April Fool's Day. I was always worried that someone would play a joke on me. I did not (nor do I now) like being the butt of a joke or being made fun of. Kids can be mean.  However, Jordan, at 6, has not had the pleasure of being pantsed in a locker room full of girls, so April Fool's Day is awesome for her. She loves joking around. She's definitely her daddy's little girl. Last year we froze orange juice in her glass and topped with just a few sips of regular juice so she couldn't drink it. She loved it. And, she has also informed me I can't do that again, since it's already been done.  So, what's a baker to do on April Fool's Day? "Fake bake" of course!


This is a super easy prank you can pull on your kids (or anyone actually). The "crust" is a sugar cookie and is topped with frosting and candies made to look like pizza toppings. (Yes, I know the frosting is pink, not red. I used "Christmas Red" from Wilton. I used a lot, and only got hot pink. Later on I was at Michael's and saw "Red-Red". Next time I will try that one!)


You can use your favorite sugar cookie recipe or a boxed mix. Choose what size pizza you want and cut it into a large circle. Bake according to the directions of the recipe and let cool completely. The "cheese" is white frosting. (I used canned.) I just melted it in the microwave for about 10-15 seconds and poured it on. For the toppings, just raid your pantry. I found all of mine in Jordan's treat box. Much of it was from her Valentine's Day candy. The box came from a local pizza establishment. They gave it to me for free.


The tootsie roll "sausages" were made with mini tootsie rolls. I heated them in the microwave for about 10 seconds until they became malleable. I then rolled them into a long rope and cut little pieces, which I formed into sausage balls. The "pepperoni" are circles cut from a fruit roll. If you don't have a small round cookie cutter you can use the lid of a water bottle, or just cut triangles. The M&M's represent bell peppers and olives. The possibilities are endless. Make a ham and pineapple pizza with a pink fruit roll-up and candied pineapple. Tootsie rolls could also be formed in to mushrooms. Let your imaginations run wild!


Serve this fake pizza to your family on Friday and wait for the laughter. It's SO much better than being pantsed, that's for sure!

Labels: , ,