Cupcake Topped Rainbow Cupcakes
Kind of a mouthful for a title, isn't it?

Will you indulge me while I wax poetic for a moment?
My daughter turned seven yesterday. Seven. As in, three years from being double digits. Halfway to being in High School. Just over ten years from now? I'll be kissing her good-bye as she leaves for college (unless I can convince her to live at home forever and allow me to still put pigtails in her hair and dress her in separates from Carter's).
Seven years ago I was given a precious gift. One I cherish every single day. I know I bitch about her a lot because, in all fairness, she does drive me crazy, but I still can't believe I get to be her mom. She's truly our little miracle (and boy, does she know it).
I get a little sad thinking about how fast it all goes. How fast I want it to go when I'm in the middle of it, because ohmygodIcan'tstanditonemoresecond. But then I blinked and she's a kid. How did that happen?
So, Happy Birthday to my sweet baby. 'Cuz no matter how much you scream at me "I AM NOT A BABY!!!" you still are, to me.

Okay, let me clear my throat, wipe my eyes, and we can move on. Let's talk cupcakes, shall we?
This cupcake topper idea comes from one of my favorite blogs to

I used my candy cup mold (from Michael's). I wanted them to be somewhat flat, so I only used about 1/4 teaspoon of cake ball. This is a great way to use up some of those cupcakes stored in your freezer. Fill the candy mold with a little candy, top with a cake ball, and then add more candy. Level it off, tap to settle, and freeze until hardened. Repeat to get all the rainbow colors. (I used some colored candy melts, some white candy melts and Wilton candy color. You can use whatever you have.)
I'm sure you've seen these cupcakes before. They were in Family Fun Magazine a few years ago for St. Patrick's Day. They take a lot of steps, but are totally cool.
You start with cake mix (I used two). Divide it equally into 6 bowls and color each with food coloring.
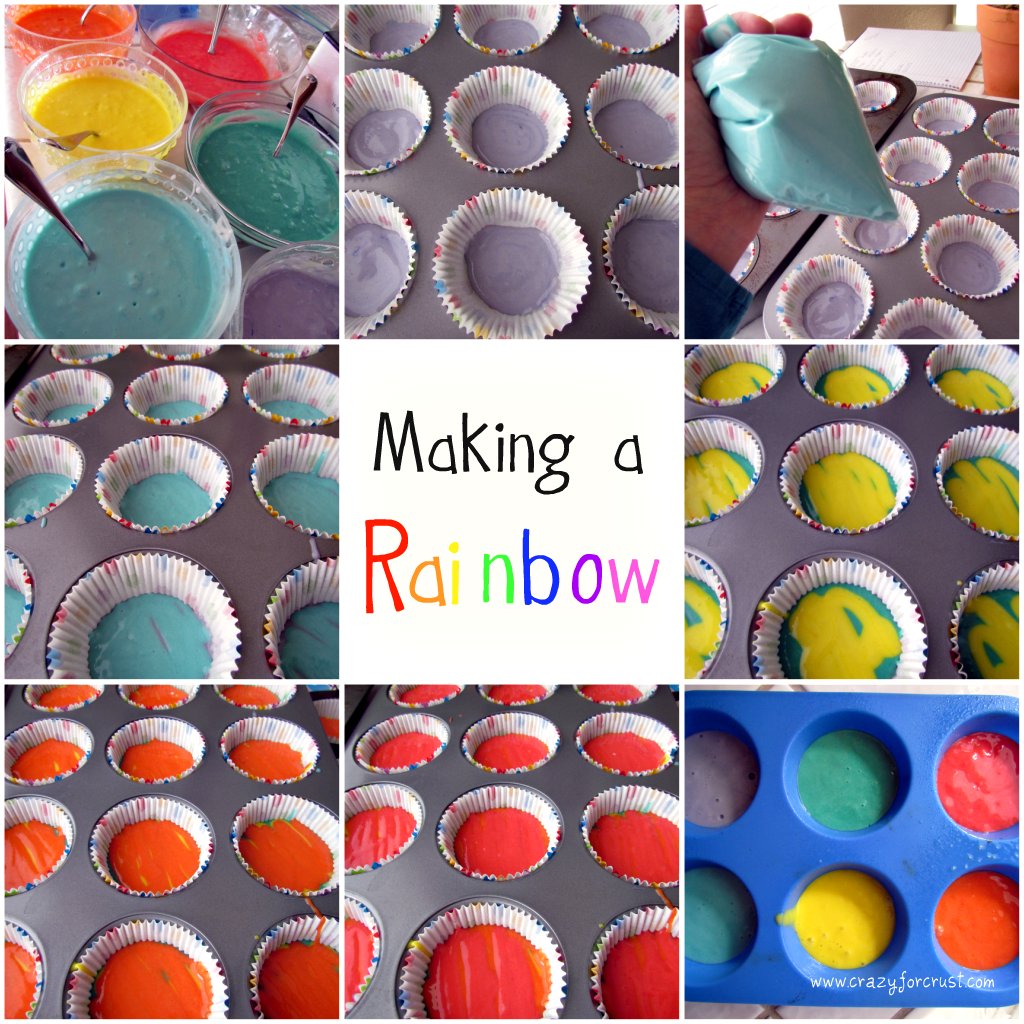
Then layer them into your cupcake liners. I used quart-sized Ziploc bags to make the piping and clean-up easier. FYI, one cake mix will not make 24 cupcakes using this method, as it normally does. It'll make about 18 or so.
I frosted the cupcakes with Marshmallow Frosting. Place your mini cupcake cake ball on top and frost it with more frosting. A cupcake topper for a cupcake!
I had a little left over of each color, so I took my silicone muffin pan and made one of each color (see bottom right picture). That will get turned into the cake.

The finished cupcakes are brilliant in color. If you don't mind the whole eating food coloring thing. No one at this party seemed to mind, which was good. Because everything had food coloring in it.

With those extra cupcakes, I made Jordan her own "little" cake. The "7" is a fruit roll-up, cut with a cookie cutter. And the inside of the cake?

A rainbow! I surprised her with the cake and she loved it. (I had to use a lollipop stick as a dowel.)
These cupcakes (and the cake, too) would be great for St. Patrick's day. I love how that day is not just green, but all things rainbow.
Thanks for reading!
Cupcake Topped Rainbow Cupcakes
by
Ingredients
- 2 boxes white cake mix, prepared with eggs, oil, and water called for
- Food coloring: red, orange, yellow, green, blue, purple (you can use the regular grocery store kind and mix the colors, but gel food coloring works best for vibrant colors)
- A double batch of Marshmallow Frosting, or your favorite white frosting
- Candy Melts in rainbow colors OR white candy melts with candy coloring
- Cake pop mixture (I used a few cupcakes I had in the freezer and some canned icing)
- Candy Cup Mold
Instructions
Make the Cupcakes- Mix the cake batter according to the recipe or box directions. Line your muffin tins with cupcake liners. (Recipe makes 32-36 cupcakes.)
- Divide your batter evenly among six bowls, about 1 1/2 cups of batter per bowl. Add food coloring to each bowl, one for each color of the rainbow (red, orange, yellow, green, blue, purple). Stir to combine.
- You are going to layer the cupcakes into the liners in a reverse rainbow, so the purple is on the bottom and the red is on the top. To make this easier to do, place each color in a separate quart-sized Ziploc bag. Seal the bag almost all the way, leaving about 1/2" open for air to escape. Snip off a tiny corner and place a small amount in each cupcake liner, starting with purple (use just enough to cover the bottom of the liner). Repeat with the remaining colors in this order: blue, green, yellow, orange, red.
- Bake according to recipe directions. Let cool completely. Frost with white frosting, to resemble clouds.
- Note: if you want to make a mini rainbow cake, you can do it by baking separate colors in muffin tins. Place about 1/2" of batter in each muffin tin hole (one for each color). Stack up like a rainbow, frosting in between each layer. A 4" lollipop stick makes a good dowel.
Make the Cupcake Toppers
- Melt your candy melts according to package directions. Fill the candy cup mold about ½ full with one color. Place about ¼ teaspoon of cake ball mixture on top and cover with more candy. Tap to release air bubbles and freeze until hardened, about 5 minutes. Remove from mold and continue until all the colors you want are finished.
- Alternately, you could make these pure candy, no cake ball inside. Or, fill with anything: peanut butter, chocolate, just plain frosting, whatever you can dream of!
Powered by Recipage

Have a Linky Party you want me to join? Add it HERE.
These are the fabulous parties I link to each week:
Monday: Mingle Monday (Add a Pinch), Joy of Desserts, Creative Monday (Clairejustineoxox), Mix it Up Monday (Flour Me With Love), Things that make you say mmmm Monday (Cooking with Karyn), Mop it Up Mondays (I should be mopping the floors), Show me what you got (Our Delightful Home). Tuesday: 2 Maids a Baking (2 Maids a Milking), Tea Party Tuesdays (Sweetology), Mushki Loves My Stuff (Mushki Loves), Totally Tasty Tuesdays (Mandy's Recipe Box), Talent Show Tuesday (Chef in Training), Trick or Treat Tuesday (Inside BruCrew Life), Let's Do Brunch (My Sweet & Savory), One Stop Shop Linky (The Southern Product Queen). Wednesday: Mrs. Fox's Sweet Party (Mrs. Fox's Sweets) Made It On Monday (Lark's Country Heart), This Chick Cooks, Cast Party Wednesday (Lady Behind the Curtain), Famous Linkz Par-tay (Made-Famous-By), Bakes with Bizzy (Bizzy Bakes), Whip it Up Wednesday (Crockpot Ladies). Thursday: Sweet Treats Thursday (Something Swanky), Chic-and-Crafty (Frugal Girls), Turning the Table Thursdays (Around My Family Table), Tasty Thursday (The How-To Mommy), Tastetastic Thursday (A little nosh), Sweet Temptations (Talking Dollars and Cents), Taking a Timeout Thursday (Mom on Timeout), Things I've Done Thursday (BearRabbitBear), (RHW Recipe Round-Up) The Real Housewives of Riverton, BFF Open House (The Answer is Chocolate), Recipe Round Up (Eat, Pray, Read, Love). Friday: Sweet Tooth Friday (Alli-n-son), I'm Lovin' it Fridays (TidyMom), Friday Favorites (Simply Sweet Home), Latest & Greatest Friday (Days of Chalk and Chocolate), Bacon Time, Fusion Friday (Jane Deere Blog), Foodie Friday (Not Your Ordinary Recipes), Dwell on Joy, Fun Finds Friday (Kitchen Fun with my 3 Sons). Saturday: Country Mom Cooks, Sweets for a Saturday (Sweet as Sugar Cookies), Seasonal Inspiration (Crumbs and Chaos), You inspire me (Polka Dot Pretties). Sunday: A Well-Seasoned Life,Sharing Sundays (Everyday Sisters), Strut your Stuff Saturday (Six Sisters' Stuff), Recipe Party (The Sweet Spot), Seasonal/Occasional Linkys: Moms Crazy Cooking, Southern Mom Cooks, Cheap Crafty Momma, Susie QT
Labels: cake, candy, cupcake, rainbow party, st. patrick's day


0 Comments:
Post a Comment
Thank you for your comment! Reading your comments is better than eating pie...and if you know me that's saying a lot. :)
Subscribe to Post Comments [Atom]
<< Home