28 April 2011

Chocolate Peanut Butter Oreo Cupcakes

Hello my name is Dorothy and I know I have a problem.  I am addicted to Peanut Butter Oreos.

This addiction started out honestly. I saw them in the store and (as I always do these days) started thinking about ways to bake with them. I didn't buy them the first time I saw them. But by the second sighting their siren song had gotten to me and I had to buy them.  Then I made Peanut Butter Oreo Brownies. And I ate a lot of them. And I ate the leftover Oreos too.

Unfortunately, the fact that I make dinner most nights and bake a lot made going to the store a necessity. I needed crackers or some unsuspecting thing and happened to walk by the Peanut Butter Oreos. So I bought them. Again. This time I knew I was using them for these cupcakes and  I knew I'd have a lot left over. So instead of eating them, I was going to dip them in chocolate and give them as a gift.

So...yeah. That didn't happen.

So instead of buying more (because you know I want more), I decided to share this fabulous recipe with all of you. I'm spreading the addiction love.


I made a chocolate cupcake. And chopped up some Peanut Butter Oreos for the inside.


Then I frosted them with peanut butter frosting. And, for good measure, added some chocolate drizzle and Oreo cookie crumbs. Because I'm nice, that's why.


You're welcome. I love you too.

Enjoy!
Chocolate Peanut Butter Oreo Cupcakes

by Crazy for Crust
Frosting from The Cake Book, Cupcake From Martha Stewart

Ingredients
    For the cupcakes:
    • ¾ cup unsweetened cocoa powder
    • ¾ cup all-purpose flour
    • ½ teaspoon baking powder
    • ¼ teaspoon salt
    • ¾ cup (1 ½ sticks) unsalted butter, softened
    • 1 cup sugar
    • 3 eggs, at room temperature
    • 1 teaspoon vanilla extract
    • ½ cup sour cream, at room temperature
    • 15 peanut butter Oreo cookies, coarsely chopped
    For the frosting:
    • ¾ cup creamy peanut butter (I used Skippy Natural, but regular is best. Don’t use the natural kind that separates)
    • 4 tablespoons (1/2 stick) unsalted butter, softened
    • 1 ½ teaspoons vanilla extract
    • 3 cups powdered sugar
    • 1/3 cup whole milk
    • ½ cup milk chocolate chips, for drizzle
    • Oreo crumbs, for garnish
    Instructions
    To make the cupcakes:
    1. Preheat oven to 350°. Line your muffin tins with paper liners.
    2. Add cocoa, flour, baking powder, and salt to a medium bowl and whisk to combine. Set aside.
    3. In an electric mixer fitted with a paddle attachment, cream the butter and sugar until light and fluffy. Add your eggs, one at a time beating well in between each addition. Beat in the vanilla. Add half the flour mixture on low speed along with half the sour cream. Mix until just combined. Repeat with remaining flour mixture and sour cream. Fold in the peanut butter Oreos.
    4. Scoop batter into muffin liners, filling each about ¾ full. Bake about 20 minutes, until a toothpick inserted in the middle comes out clean. Cool completely before frosting.

    To make the frosting:
    1. Using an electric mixer with the paddle attachment, beat the butter and peanut butter until well blended. Add the vanilla and mix until blended and smooth. Scrape the sides of the bowl when necessary. Turn the mixer to low speed (unless you like wearing powdered sugar) and add half the powdered sugar with half the milk. Mix until just blended and repeat with remaining powdered sugar and milk. Beat on low until creamy, about 1 minute.
    2. Frost cupcakes. To make chocolate drizzle, melt ½ cup of chocolate chips in microwave. Add to a Ziploc bag and snip of a tiny tip of one corner. Drizzle melted chocolate over cupcakes. Sprinkle with Oreo crumbs. Chill to harden.

    Serve cupcakes with ice cream or a tall glass of milk or some vanilla ice cream – they need a chaser!

    Powered by Recipage

    Enjoy!

    Labels: , ,

    26 April 2011

    Lemon Cream Pie

    Dear Spring,

    Remember a few weeks ago? When you had finally arrived after so much rain? When we basked in your warmth, went to the park every day, wore shorts and capris and flip flops?

    What happened? Are you angry at us? Why did you leave us right when we wanted you most? Really, did you mean to leave us with all this wind and rain? My feet are unhappy they have been forced back into socks. Plans for outdoor activities have had to be canceled. Why did you tease us so, Spring?

    In an effort to get back on your good side, I have decided to make you a treat that will delight you and make you remember sun and warmth and all the good things you have to offer. I am offering you this delicious Lemon Cream Pie.


    Please accept it and enjoy it and bring back our sunny, warm, pedicure-needing weather. The pie is creamy and lemony and tastes, amazingly, like a Girl Scout Lemonade cookie (but with a crumbly, buttery graham cracker crust).  You can even freeze it for those hot Spring days you are sure to bring us.


    Thank you for accepting this offering, Spring. I hope you will consider letting go of the cold, windy weather and bringing back what you are best at: warmth and happiness.

    Sincerely,
    Dorothy

    ************

    In other awesome news, my post for my Baby Peeps was chosen as a Sweet Tooth Favorite last week! I've been joining Alli-n-son for the past few weeks for her Sweet Tooth Friday linky party and I was so ecstatic to read her post on Saturday morning and find out that I had been picked as a favorite. Her blog is great; some awesome recipes and ideas there! Be sure to check it out.

    Happy Monday!

    Lemon Cream Pie

    by Crazy for Crust

    Ingredients
      For the Crust:
      • 10 graham cracker sheets
      • 2 tablespoons brown sugar
      • 1 stick butter, melted
      For the Whipped Cream:
      • 1 cup heavy whipping cream
      • 2 tablespoons sugar
      • 1 teaspoon vanilla
      For the Lemon Cream:
      • 1 can sweetened condensed milk (fat-free is fine)
      • ¾ teaspoon lemon zest
      • ½ cup fresh lemon juice (about 3-4 lemons)
      • ¼ teaspoon pure lemon extract
      Instructions
      1. To make Crust: preheat oven to 350°. Pulse graham crackers in a food processor until finely ground. Place in a large bowl and add brown sugar and butter. Stir with a fork until combined. Press into a 9” pie plate. Bake for 12-15 minutes until brown. Cool completely.
      2. While crust is cooling, make whipped cream. (I find it best to chill my mixing bowl before starting, so everything is super cold.) Add cream and sugar to the bowl of an electric mixer and beat on high speed until it doubles in size, then add vanilla. Continue beating on high speed until fluffy whipped cream forms. Chill until ready to use.
      3. Stir sweetened condensed milk, ½ teaspoon lemon zest, lemon juice, and lemon extract in a large bowl until combined. Add half of your whipped cream and stir carefully until completely incorporated. Pour into cooled crust.
      4. Decorate the top of your pie with the rest of your whipped cream. You can spread it in an even layer or pipe it on using a star tip. (I used star tip #22 in a disposable pastry bag.) Sprinkle with remaining lemon zest. Chill until ready to use. Refrigerate leftovers. The pie is also good frozen for a cool summer treat.
      Powered by Recipage

      I link up to all of these fabulous parties each week!
      Tea Party Tuesdays at Sweetology, Talent Show Tuesday at Chef in TrainingTrick or Treat Tuesday at Inside BruCrew Life, Cast Party Wednesday at Lady Behind the Curtain, Sweet Treats Thursday at Something Swanky, Chic-and-Crafty at the Frugal Girls, Tastetastic Thursday at A Little Nosh, Sweet Tooth Friday at Alli-n-sons, I'm Lovin' it Fridays at TidyMom, Sweets for a Saturday at Sweet as Sugar Cookies, A Well-Seasoned LifeStrut your Stuff Saturday at Six Sisters' Stuff, and all of these too!

      Labels: ,

      22 April 2011

      Chocolate Bunny

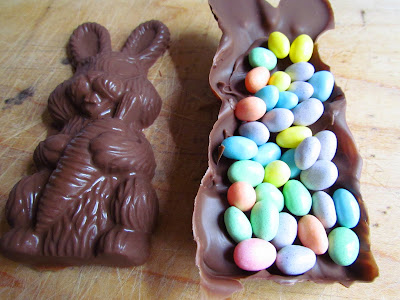
      This little bunny has a secret.


      He's chocolaty. That's not the secret.

      Any guesses?


      He's cute. Or maybe he's a she? I don't know. Chocolate molds don't well...never mind.

      He rattles.

      Oops did I give it away?

      Jordan has to wait until Easter to know, but I'll spill the "beans" to you all now...


      Mr. Bunny is full of jelly beans!

      I think Jordan will flip. A chocolate treat with a bonus. How does it get better than that? (Well, I personally would have loved if he was filled with peanut butter. Maybe next year?)

      Happy Easter everyone! May you eat your weight in whatever you gave up for Lent.

      Labels: ,

      20 April 2011

      Cupcake Bunnies

      Last weekend I was invited by a friend (who I haven't seen in way too long) to go to her house and make cupcakes. She had bought Better Homes and Gardens' Cupcake magazine and wanted to try some recipes. Of course I said yes, who says no to a cupcake party? I'll have a few cupcakes to share from our day of baking, but I wanted to share these little guys this week, for Easter.


      Aren't they super cute? And they are so easy. We used a box mix for the cupcakes and canned frosting. (Confession time: I actually like boxed cake mix and canned frosting, so once in awhile I go the easy route.)

      What do you think the two in the back are talking about?

      I used a multiopening tip (a grass tip) for the bunny "hair". The ears are large marshmallows, cut in half. The eyes are white chocolate chips and the nose is a pink jelly bean. Black and pink frosting gel make up the ear centers, the whiskers, and pupils.

      It was fun giving them different expressions too.


      And it was fun making them looked freaked out. Think they thought aliens were coming to get them? Or maybe they're scared they are going to get eaten? (Hee hee!)

      Kids will love these! If you don't have a grass tip, you could use coconut. But, if your kids are like mine, they won't eat them. You could grate some white chocolate or white Wilton's candy melts to make fur. Anyway you do it they will be darn cute, that's for sure!


      Enjoy!

      Cupcake Bunnies
      by Crazy for Crust
      From Better Homes & Gardens magazine

      Ingredients
      • 24 baked and cooled cupcakes (a box or from scratch)
      • 1 can of white frosting (or from scratch)
      • 24 large marshmallows
      • 48 white chocolate chips
      • 24 pink jelly beans
      • Pink gel icing (or tinted pink icing)
      • Black gel icing (or tinted black icing)
      Instructions
      1. Frost each cupcake with a small amount of icing. (This makes it easier to cover the top with the fur.)
      2. Using a pastry bag fitted with a multiopening tip, pipe on the fur to cover the cupcakes.
      3. Cut each marshmallow in half to create two ears. Pipe a pink stripe down the center of each. Press the ears into the cupcakes.
      4. Place two white chocolate chips on each cupcake for eyes. Place a small dot of black icing in the center of each.
      5. Place a pink jelly bean on each cupcake for the nose. Pipe black whiskers on each bunny.
      Powered by Recipage


      I'm linking up with:


      Labels: ,

      18 April 2011

      6th Birthday Cupcakes

      I love when people ask me to bake things for them.

      Love love love it.

      So when a friend of mine asked me to make the cupcakes for her daughter's 6th birthday, I was very honored. Her daughter is a girl who loves her pink, so that was one of the forces behind this cupcake. She didn't have a specific theme, and asked for something to do with the number six.


      The birthday girl loves Oreos, so I made Cookies & Cream "Oreo" Cupcakes with their super yummy frosting. Pink cupcake liners and pink sanding sugar, of course. And the cupcake topper is actually a chocolate sugar cookie with royal icing in the shape of the number six. For display, I wrote the birthday girls' name in chocolate and let it harden, then placed it on top of her cupcake at singing time.

      The birthday girl (and her mom) loved the cupcakes. Thanks to them for giving me the opportunity to make them!

      Labels: , , ,

      15 April 2011

      Chocolate Sugar Cookies (Easter Egg Cookies)

      I've wanted to try out chocolate sugar cookies for a long time, so when I thought about making cookies for Easter I decided to go for it. They do not disappoint! Super soft and chocolaty but not too sweet; they make a great pairing for the crunch and sweetness of royal icing.


      So my technique isn't perfect, but I'm learning as I go! What I really need to work on next time I make decorated cookies is my patience. I have none. Originally I wanted to do three-dimensional decorations, like the pink egg in the back. But I couldn't wait for the icing to dry, so I decided to do flooding decorations instead. This is done by using a freshly flooded cookie and a second icing color that is flooding consistency. Draw on your design and use a toothpick to drag straight lines down the cookie to achieve your decoration.

      You can do zig-zags:


      Or Hearts:


      Or, if you run out of the yellow icing before you've flooded the cookies edged in yellow, you can make tie-dye:


      Lessons I learned this time I used royal icing:

      1. Have patience.
      2. Have patience.
      Oh yeah, and...
      3. Have patience!

      These cookies would also be good with any kind of icing you like; royal icing is not the requirement. I must say I really enjoy the combination of the sweetness from the icing and the chocolate from the cookie. Your mouth expects sugar cookie when it tastes the icing and is pleasantly surprised by the chocolate flavor it actually gets.

      Enjoy!

      Easter Egg Cookies (Chocolate Sugar Cookies)
      by Crazy for Crust
      From Annie's Eats 

      Ingredients
      • 1 1/2 cups all-purpose flour
      • 2/3 cup cocoa powder
      • 1/4 teaspoon salt
      • 12 tablespoons (1 1/2 sticks) unsalted butter, softened
      • 1 1/2 cups powdered sugar
      • 2 eggs
      • 1 teaspoon vanilla extract
      Instructions
      1. In a medium bowl, combine the flour, cocoa powder, and salt. Whisk to combine and set aside.
      2. Using an electric mixer, beat the butter and sugar until fluffy, about 2-3 minutes. Add the eggs, one at a time, mixing well in between additions. Mix in vanilla. Add the dry ingredients on low speed (really, do it low or you and your kitchen will be wearing cocoa). Mix until just combined. Divide the dough in half and form each half into a round disk. Wrap each disk in plastic wrap and refrigerate until firm enough to roll, about 1-2 hours.
      3. Preheat oven to 325 degrees. Line your baking sheets with parchment paper. Remove one portion of dough from the refrigerator and roll out on a well-floured surface until about 1/4-thick. Cut with desired cookie cutters. Place on parchment lined baking sheet. Bake 8-12 minutes, depending on size. Rotate pans halfway through baking time. Repeat with remaining dough. Cool completely.
      4. Frost or decorate as desired. Royal Icing pairs well with these cookies.

      The amount of cookies depends on the size of your cookie cutter. This made about 24 Easter egg cookies (2 1/2 inch cutters).

      Powered by Recipage

      Labels: , ,

      13 April 2011

      Baby Peeps

       
      Oh look, some cute little chocolate eggs!


      Oh look! One's hatching! What could it be?


      It's a baby Peep!

      While looking for ideas for my daughters' Easter basket, I thought about all the chocolate eggs and bunnies you can buy in the store.  I got to thinking, why don't I just get a mold and make some eggs? I can make how many I want, control the ingredients, and I won't have a whole bag of leftover candy that I she will devour after the fact. I've been seeing all sorts of Peeps goodies lately so the idea for these popped inside my head.

      I got my egg-shaped mold at An Occasional Chocolate. I get a lot of my chocolate crafting supplies from them. I also got a large bunny shape (more to come from that next week!) Usually when working with chocolate, I prefer to use Guittards Melt 'n Molds, but I didn't have any and forgot to order some when ordering the molds. So I used Wilton Light Cocoa Melts, and they actually tasted pretty good.

      Here is the mold I used. Pretty cute!


      I used the same method to make these eggs that you would if you were using a truffle mold.


      First, fill your eggs with chocolate. (Make sure to use ones with matching designs!)  The entire mold needs to be filled so all the sides are covered with chocolate up to the top. Then pour your chocolate back into your bowl. Use a spatula or knife to scrape all the chocolate. (I work on my Griddler set at 200 degrees and covered with a kitchen towel. My chocolate bowl and squeeze bottle stay on the warm grill to keep the chocolate melted.)  After you dump out the chocolate you are left with hollow chocolate eggs. Freeze these for a few minutes until hardened. Then pop out the shells and you have two sides of a hollow chocolate egg!


      Now you need to prepare your Peeps. My molds weren't quite big enough for the entire Peep, so surgery had to be done.


      I cut off the front and back "wings" with kitchen scissors. Then he fit right into the egg.


      To seal the egg, pipe melted chocolate from your squeeze bottle around the edge. Press the two halves together and hold. Wipe off any excess chocolate spillage. I held each egg in the freezer for about 30 seconds, then left it in the freezer for a few minutes to harden.

      Jordan and my mother- and sister-in-law really enjoyed "cracking" open the eggs. I gave them each a butter knife and had them hammer the shells open. So fun to watch Jordan's face when she saw the baby Peep.

      What's great about this treat is that you can make as many (or few) that you want. One bag of Wilton's Melts will make about ten eggs. The nests are made out of edible Easter grass I found at Joann Fabrics. Neat, huh? No more nasty plastic stringy grass that gets everywhere!

      Enjoy hatching some baby Peeps!

      Baby Peeps
      by Crazy for Crust

      Ingredients
      • 1 bag Wilton's Light Cocoa Melts
      • About 10 Peeps
      Instructions
      1. Melt your cocoa melts using the microwave directions on the back of the bag. Heat an electric griddle to 200 degrees and cover with a kitchen towel. Place the bowl with your melted chocolate on the griddle to keep it warm.
      2. Add chocolate to the egg molds, filling them to the top. Pour the excess chocolate back in the bowl, scraping the top of the mold with a butter knife or spatula. Freeze molds for a few minutes until chocolate is hardened. Pop out.
      3. To prepare your Peeps, cut off the tail around the bottom of the body. Place a Peep in half of each pair of eggs.
      4. Transfer some chocolate to a squeeze bottle. Pipe the chocolate all the way around the egg and place the top half on. Press and hold to seal. Hold the egg in the freezer for 30 seconds, then leave in freezer for a few minutes to harden. **Do not seal more than one egg at a time. Unless you have 6 hands!**
      Watch your kids wonder as their baby Peeps "crack" out of their shells!

      Powered by Recipage


      Labels: , ,

      11 April 2011

      Black Bean Burgers

      I love black beans. I love all beans, really, but black beans especially. If they're on the menu at a restaurant, I order them. Have you tried my refried black bean recipe? So good. I eat the entire recipe. Then I make more and have a taco salad.  So when I saw Sandra Lee make this recipe on one of her shows I knew I had to try it.  I don't think my husband was as excited about this recipe as I was, but he surprised himself by actually liking them.


      You start with two cans of black beans (seriously, looking at this picture makes me think of the possibilities...and drool).


      Blend one can (drained) in the food processor with the onion, garlic, parsley, egg, and red pepper flakes.


      Yes, it looks like dog food. Don't fret, the smell is wonderful.

      Now you combine the processed mixture with the other can of beans and a bunch of breadcrumbs. When I made them for dinner last week I went to my cabinet to get the breadcrumbs...and there were none. I almost cried, then realized that I'm a foodie now. I could make some. So I did.


      Note: if you go this route, use two slices of bread. I only used one and they weren't as absorbent as the store-bought breadcrumbs.


      Form them into patties. Isn't the little one so cute? I make Jordan her own little one so I can have the pleasure of watching her make faces, gag, retch, and shout "these are so gross!"

      I use my Cuisinart Griddler to grill these up, but you could use a frying pan. (Sidebar: I absolutely love my Griddler. Best. Gift. Ever.)


      I like mine with cheese. Mr. Weight Watchers doesn't.


      These are best served with lettuce or tomato or pickles (bacon would be awesome). They are soft so they need to be paired with something crunchy. I was going to make an avocado spread, but I cut open my avocado and it was black. Oops. Next time.


      So good. Makes me want one now. Next time I'll make and try freezing some, so when this urge hits I can satisfy it easily. Go vegetarian for a night. You won't be sorry. And you'll save some money too.

      Enjoy!

      Black Bean Burgers

      Ingredients:
      1/2 medium yellow onion, roughly chopped
      2 cloves garlic
      2 (15-ounce) cans black beans, rinsed and drained
      1/4 cup fresh parsley, chopped
      1 egg
      1/2 teaspoon red pepper flakes
      1/2 cup bread crumbs
      Salt and Pepper to taste
      4-5 Hamburger Buns
      Misc. toppings (see below)

      Directions:
      1. Pulse onion and garlic in a food processor until finely chopped.  Add 1 can black beans, parsley, egg, and red pepper flakes and pulse until combined. Place bean mixture in a large mixing bowl and add breadcrumbs and remaining can of black beans. Stir to combine. Taste; season with salt and pepper.
      2. Heat a grill pan or frying pan over medium-low heat.
      3. Form beans into patties. Be sure to make them the same size as your hamburger bun! Spray grill with cooking spray and grill patties about 5-6 minutes per side, until golden brown and heated through.
      Serving suggestions: Lettuce, tomato, pickle, onion, crisp cooked bacon, guacamole, mustard, ketchup...the list is endless! Make them like you'd eat your hamburgers, but make sure to add some crunch.

      Yield: 4-5 bean burgers, depending on size.

      Source: Sandra Lee (FoodNetwork.com)

      Labels: ,

      07 April 2011

      Maple Filled Doughnut Muffins

      Remember those Maple Cookies I made? With that give-me-more-I-need-it-now maple frosting? I had to have it again because I couldn't stop thinking about it.


      So I made some doughnut muffins.


      And I filled them with the addicting frosting.

      And the, to top it all off, I brushed them with butter and dipped them in cinnamon sugar.


      You're welcome.

      If you read food blogs at all, you will have seen some version of these doughnut muffins before. My friend Joann gave me this recipe. Lite and fluffy and not too sweet, they are the perfect do-anything-with-them muffin. They are a great base to build on. Like, say, to fill with maple frosting. After I ate them I though the only thing that would have made them better would be more frosting. Next time I'll frost the top with the maple too. Because you can never have enough maple. There was enough left over to frost the tops. But instead? I ate it with a spoon.


      And now darn it, writing this post has made me want that frosting again! They make tummy control bathing suits, right?

      Enjoy!

      Doughnut Muffins with Maple Filling

      Ingredients:
      For the doughnut muffins:
      ¼ cup butter, softened
      ½ cup sugar
      1 egg
      1 ½ cups flour
      2 ¼ teaspoons baking powder
      ¼ teaspoon salt
      ¼ teaspoon nutmeg
      ½ cup milk (I recommend regular milk. I used nonfat and they were slightly dry.)

      For the maple filling:
      4 tablespoons butter, softened
      1 cup powdered sugar
      2 tablespoons real maple syrup
      1/8 teaspoon maple extract
      1-2 teaspoons whipping cream

      For the topping:
      3 tablespoons butter, melted
      ¼ cup sugar
      ¼ teaspoon cinnamon
      **Or, ditch the topping and use the maple filling to frost the muffins!**

      Directions:
      1.    Preheat oven to 350°. Line your muffin pan with liners.
      2.    Whisk together flour, baking powder, salt, and nutmeg. Set aside.
      3.     Mix the butter and sugar with a hand mixer until fluffy. Add in egg and mix well.
      4.    Add the flour mixture to the butter and sugar mixture. Add the milk and mix completely.
      5.    Divide among muffin liners and bake 15-20 minutes, or until slightly golden (a toothpick will come out clean). Cool completely before filling.
      6.    To make the frosting, beat butter with hand mixer until fluffy. Slowly add in powdered sugar and syrup. Add maple extract and whipping cream and blend until combined.
      7.    To fill the muffins, use tip #230 in a disposable pastry bag. Insert tip deep into the cupcake and squeeze filling in. About 1-2 teaspoons will fit in each. You can also use a small knife to cut out the center of the muffin and spoon in the filling.
      8.    To top the cupcakes, brush lightly with the melted butter. Combine the cinnamon and sugar in a shallow bowl. Dip the muffin butter-side down in the sugar to coat. Or, instead of using this topping, you can frost the muffins with the maple filling.

      Yield: 9 muffins

      Source: Muffins adapted from recipezaar.com and filling adapted from dreamaboutfood.blogspot.com.

      Labels: ,

      05 April 2011

      Peanut Butter Oreo Brownies


      Yes, your eyes are not playing tricks on you. There are in fact Peanut Butter Oreos! Have you seen them yet? Why do these companies keep trying to make me fat? Because as soon as I saw them I had to buy them. Better yet, they taste as good as they sound. So of course, I've got a package of these evil little cookies in the cabinet. If I leave them there, I'll eat them all. And then need to shop for new pants. So what's a girl to do?


      Make brownies with them, of course.


      Really? These should be illegal. I mean, if San Francisco can outlaw Happy Meal toys in meals that are too fattening, shouldn't Nabisco be fined for creating something so yummy?

      I served these at a dinner party, but had several left over. I ate three one a day for three days. Then (even though I hate wasting food) I made myself throw the remainders away. I even threw coffee grounds on top of them in the trash. (Come on, fess up, you know you've done it.) I know I should have frozen them for later, but you know what? I still know they're there. The freezer isn't a barrier that will stop me from eating treats.


      Next time you're in the mood for brownies, make these. You can use any flavor of Oreo you want. But really? Peanut butter and chocolate? That's one of the best things out there.  These brownies would be good with ice cream too (if you want to really torture yourself at the gym the next day, ha!). 

      On a side note, I'm playing with fonts. I like this one. What do you think?

      Enjoy!

      Peanut Butter Oreo Brownies

      Ingredients:
      24 Peanut Butter Oreo cookies, chopped*
      ¾ cup cocoa powder
      ½ teaspoon baking soda
      2/3 cup butter, melted and divided in half
      ½ cup boiling water
      2 cups sugar
      2 eggs
      1 1/3 cups flour
      1 teaspoon vanilla extract
      ¼ teaspoon salt

      Directions:
      1.       Preheat your oven to 350°. Line a 9x13 inch baking pan with foil and spray with cooking spray.
      2.       Coarsely chop your Oreos. (I cut them in quarters and then rough chopped the pile.) Set aside.
      3.       Add cocoa and baking soda to a large bowl and stir to combine. Stir in 1/3 cup of melted butter. Add the boiling water and stir until the mixture thickens. Add sugar, eggs, and remaining 1/3 cup butter and stir until combined. Stir in flour, vanilla, and salt and stir until completely incorporated. Stir in Oreos. Spread in pan.
      4.       Bake 30-35 minutes, until brownies begin to pull away from the side of the pan. Cool completely before cutting into squares.

      Yield: about 30-35 brownies.

      *You can use any flavor of Oreo you want.

      Source: adapted from Hershey’s


      Labels: , ,